For many dogs, the thought of IV catheter placement and removal is one of the most stressful parts of a veterinary visit. Even friendly dogs can become anxious or fearful the moment clippers, alcohol, and restraint appear. This stress can cause struggling, missed attempts, and in some cases, long-term fear of veterinary visits.
Fortunately, Fear-Free techniques can dramatically reduce anxiety for dogs during both IV catheter placement and removal. By focusing on emotional safety, gentle handling, and cooperative care, veterinarians can achieve higher success rates, fewer staff injuries, and a more positive experience for dogs and their owners.
In this blog, we will cover step-by-step Fear-Free techniques for both IV placement and removal, so you can implement them in your practice or understand what makes a truly low-stress veterinary experience for dogs.
Why Dogs Fear IV Catheters
Dogs don’t fear the needle itself—they fear:
- Loss of control over their body
- Strange smells, such as alcohol or antiseptic
- Loud clippers or hospital sounds
- Forced restraint
- Past painful experiences
- Separation from their owner
When dogs are stressed, their veins constrict, muscles tense, and struggling increases, which makes IV placement more difficult. Stress during removal can also trigger panic, resulting in bites, scratches, or accidental dislodgement.
Fear-Free techniques address the emotional component of stress, breaking the cycle:
Fear → Struggling → Missed veins or painful removal → More fear
Step 1: Prepare a Calm Environment
A calm dog starts with a calm environment.
- Dim the lights
- Reduce noise from monitors or clanging instruments
- Keep the room free of unnecessary movement
- Allow the dog to stay near their owner if possible
- Place a non-slip mat or towel on the table to reduce discomfort
A dog that feels physically secure is far less likely to panic.
Step 2: Pre-Visit and In-Clinic Calming
Before attempting IV placement or removal, help the dog reach a baseline state of relaxation. Techniques include:
- Using dog pheromone diffusers such as Adaptil®
- Playing soft classical music
- Offering lick mats or soft treats
- High-value treats such as chicken or cheese
- Gentle stroking on the chest or shoulders
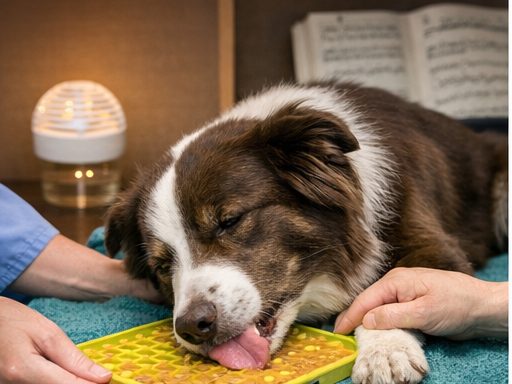
Many dogs can tolerate IV placement while focused on licking a treat or chewing a soft food, significantly reducing stress.
Step 3: Cooperative Positioning
Traditional “pin the dog down” restraint increases anxiety. Fear-Free handling focuses on cooperative positions:
- Standing or sternal recumbency for placement
- Side-lying only if necessary
- Minimal gentle body contact
- Allowing the dog to lean into the handler rather than forcing a position
Cooperative positioning allows dogs to maintain a sense of control, reducing struggling and improving vein accessibility.
Step 4: Desensitize Equipment
Dogs often react strongly to clippers, alcohol, or antiseptics. Reduce fear by:
- Turning clippers on away from the dog before use
- Allowing the dog to sniff alcohol pads
- Warming alcohol pads in your hands
- Using quiet, low-vibration clippers
- Shaving a slightly larger area to avoid repeat clipping
Desensitization prevents sudden fear reactions that could complicate placement.
Step 5: Select Vein and Catheter Size
Choosing the correct vein and catheter reduces trauma and increases success:
- Cephalic vein: easiest for calm dogs
- Lateral saphenous vein: good for fearful dogs
- Medial saphenous vein: minimal restraint needed
Use the smallest catheter suitable for treatment. Smaller catheters are less painful and easier to place.
Step 6: Use Distraction and Positive Reinforcement
Distraction is a cornerstone of Fear-Free IV care. While one technician places the catheter:
- Another provides treats continuously
- Use a lick mat or soft food
- Gentle head and chest petting
- Calm verbal reassurance
Many dogs don’t even notice the catheter being inserted when appropriately distracted.
Step 7: Gentle Technique
Technical skill matters for Fear-Free care:
- Use new, sharp catheters
- Insert slowly and steadily
- Avoid “fishing” for veins
- If missed, pause, reward, and reassess
One calm, successful attempt is better than multiple rushed tries.
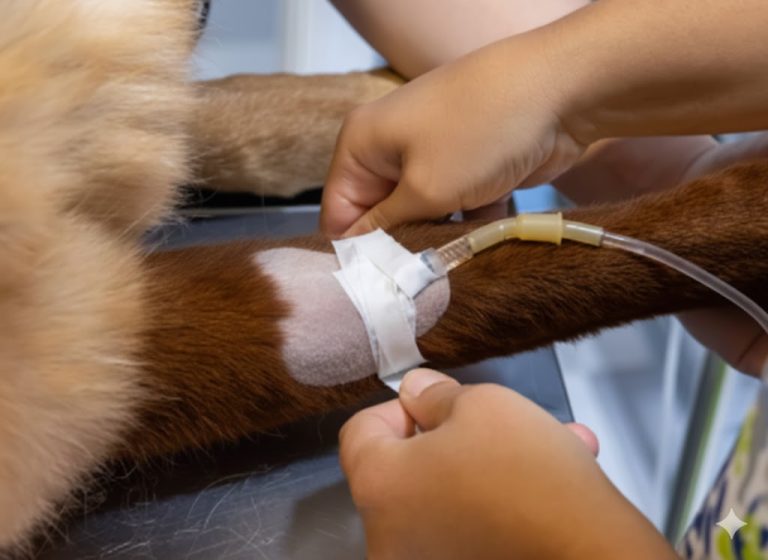
Step 8: Secure the Catheter Comfortably
Post-placement comfort is critical:
- Use soft padding or cohesive bandage
- Avoid overly tight wraps
- Keep toes visible
- Check for swelling or irritation
- Reward immediately after placement
A positive end to the procedure helps the dog associate veterinary care with safety and treats.
Step 9: Fear-Free IV Removal
Many dogs experience equal or greater anxiety during catheter removal. Use the same Fear-Free principles:
- Prepare the Environment: Keep lights dim, minimize noise, and ensure a soft, non-slip surface.
- Positive Distraction: Use treats, lick mats, or gentle stroking during removal.
- Gentle Handling: Hold the leg or paw securely but minimally, avoiding excessive pressure.
- Slow, Steady Removal: Pull the catheter out at a steady pace while talking calmly.
- Immediate Reward: Offer treats or praise as soon as the catheter is removed.
Fear-Free removal reduces panic, prevents accidental scratches or bites, and ensures the dog remains calm for future visits.
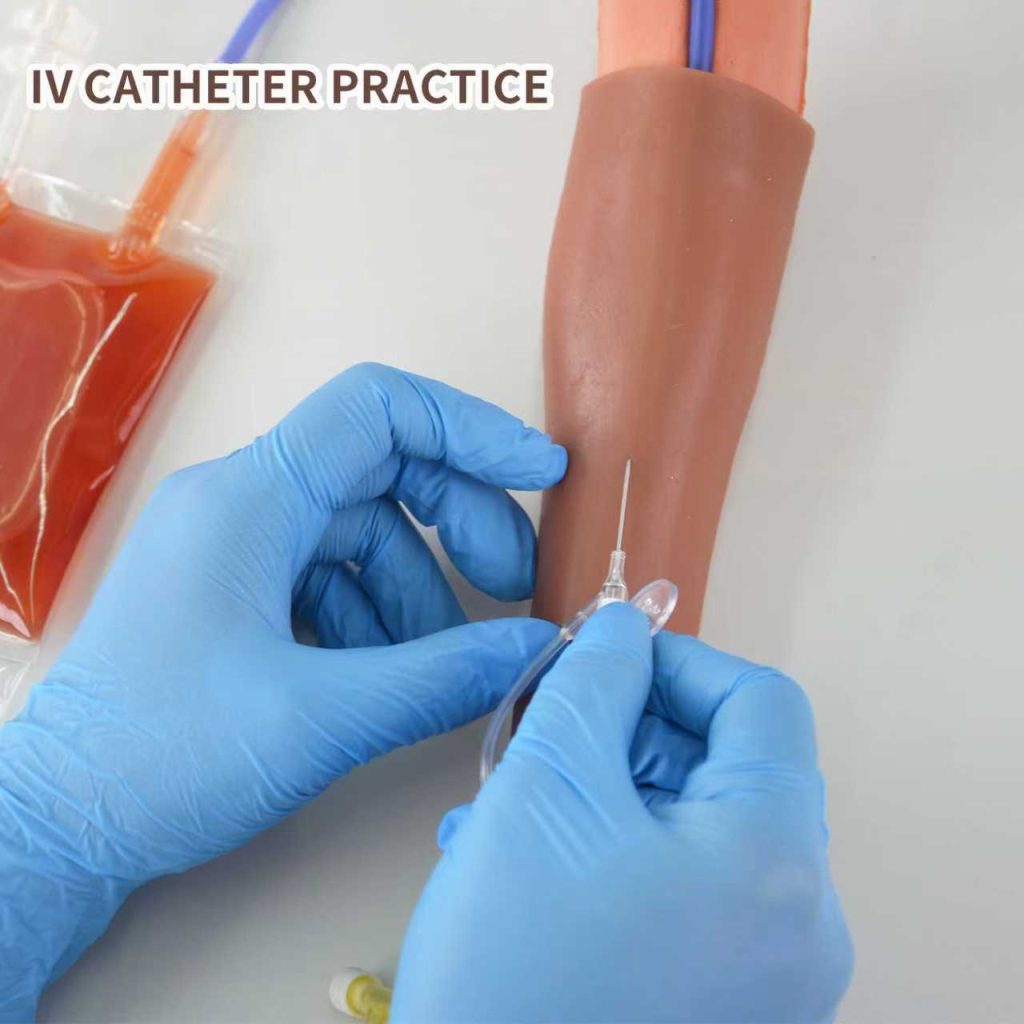
Step 10: Choosing the Right Canine IV Simulator
For veterinary clinics, training centers, or pet owners who want to practice these techniques safely, choosing the right canine IV simulator is essential. A high-quality simulator allows technicians and students to practice cooperative handling, distraction techniques, and secure catheter placement and removal without causing stress to real dogs. By incorporating simulators into training, teams can gain confidence and refine their skills, ensuring that every real-life IV experience is as calm and stress-free as possible.
When to Consider Sedation
Some dogs may still panic despite all Fear-Free measures. Light sedation can be considered when:
- The dog is extremely anxious
- Multiple staff are required
- Safety is at risk
- The dog has a history of traumatic experiences
Light sedation can reduce emotional trauma and ensure safe, efficient catheter placement and removal.
Benefits of Fear-Free IV Care
Implementing Fear-Free techniques provides:
- Higher first-stick success rate
- Reduced dog struggling
- Fewer staff injuries
- Shorter procedure time
- Increased client trust and satisfaction
- Improved long-term patient behavior
Fear-Free IV care is not slower—it is smarter, safer, and kinder.
- Forcing the Dog: Physical restraint alone increases fear and risk.
- Ignoring Distraction: Food or attention can make a huge difference.
- Rushing the Procedure: Calm, deliberate action works better than speed.
- Neglecting Removal: Many staff forget that removal is just as stressful as insertion.
- Skipping Environment Prep: Bright lights, noise, or cold tables trigger anxiety.
Case Study: Fear-Free Success
A Golden Retriever was previously anxious during IV placement. By using a lick mat, gentle stroking, soft lighting, and cooperative positioning, the catheter was successfully inserted on the first attempt with no struggling.
During removal, the same techniques were used, and the dog remained calm, wagging its tail, and eating treats throughout the procedure.
This demonstrates that Fear-Free techniques are effective, replicable, and beneficial for both dogs and staff.
Final Thoughts
Dogs remember veterinary experiences. Traumatic IV placement or removal can cause lifelong fear, while calm, gentle, Fear-Free techniques build trust and positive associations.
Fear-Free IV placement and removal are not just acts of kindness—they are best practice veterinary medicine.
By implementing these strategies, you can reduce stress, improve success rates, and ensure every dog leaves the clinic calmer than when they arrived.