Quick Answer
To set up a dog IV practice kit, mix the simulated blood powder completely with clean water, fill the 100 mL blood bag, connect it securely to the model tubing, hang the bag above the leg, prime the line until liquid reaches the simulated vein, and close the outlet clamp. For fluid-drip practice, fill the reusable 500 mL bag with water, attach the drip set with its roller clamp closed, connect it to the model, then open the appropriate clamps and adjust the flow. The model supports flashback, catheter insertion and advancement, blood draw, fluid infusion, and taping practice.
For a clearer flashback response in this simulator, use a 20G catheter or a larger-bore catheter, such as 18G or 16G. Remember that a lower gauge number means a larger internal diameter. This is a simulator setup recommendation, not a clinical catheter-selection rule for live patients.
What Is Included in the Dog IV Practice Kit?
Check every component before adding liquid. A complete kit includes:
- 100 mL blood infusion bag × 1
- Dog IV leg model × 1
- Reusable 500 mL fluid bag and IV drip set × 1
- Blood-collection syringe × 1
- 60 mL syringe × 1
- 60 mL long-tip syringe × 1
- Bandage tape × 1
- Cannula tape × 1
- IV catheters × 2
- Alcohol pads × 4
- Simulated blood powder, 10 g × 1
The 100 mL bag supplies simulated blood to the model for flashback and blood-draw practice. The 500 mL bag and drip set are used for fluid-infusion setup. The standard and long-tip syringes make it easier to fill the two bags through their different connectors. The tape supports catheter securing and post-access bandaging practice.
Before You Start: Mix and Prime the System
Mix the Simulated Blood
A practical starting ratio is 1 g of simulated blood powder to 500 mL of clean water. Use slightly more or less powder only to adjust the colour intensity. Stir until the powder has fully dissolved before it enters the bag. Undissolved particles can obstruct narrow connectors or tubing and make the flashback response inconsistent.
Prime the Tubing and Remove Air
Priming means filling the line with liquid before practice begins. Hang the filled bag above the model, open the required clamp, and let simulated blood move through the tubing until it reaches the vein pathway. Gently tap high points in the line so trapped bubbles travel toward the outlet. Once the line is filled and large air pockets are gone, close the outlet clamp. This prepares the system for a more consistent flashback response.
How to Set Up Simulated Blood, Flashback, and Blood Draw
- Prepare the liquid. Fully dissolve the simulated blood powder in clean water.
- Fill the syringe. Draw the mixed simulated blood into the standard 60 mL syringe.
- Fill the 100 mL bag. Screw the syringe firmly onto the threaded bag connector before injecting the liquid. A loose connection is the most common source of leakage at this step.
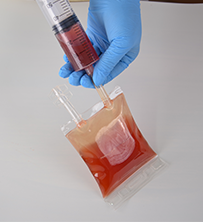
- Connect the bag to the model. Push the blood-bag connector fully into the model tube. Check that the tubing is not folded or pinched.
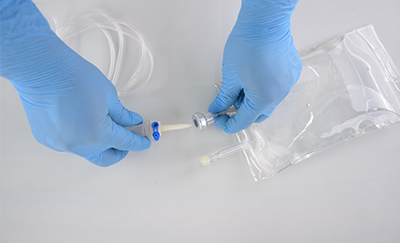
- Raise the bag. Hang the bag above the leg model. The height creates the pressure needed for visible flow and flashback.
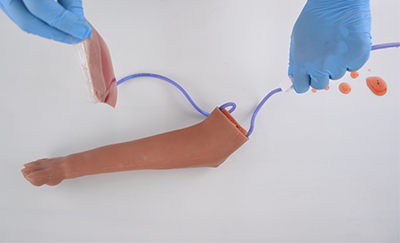
- Prime the vein pathway. Open the appropriate clamps until simulated blood reaches the vein tubing and major air pockets have moved out.
- Close the outlet clamp. Closing the end tube retains liquid and pressure inside the system.
- Begin practice. Learners can now practise finding the simulated cephalic vein, inserting and advancing a catheter, observing flashback, drawing simulated blood, securing the catheter, and taping the leg.
How to Set Up the IV Fluid Drip
- Remove the stopper. Unplug the stopper from the reusable 500 mL fluid bag.
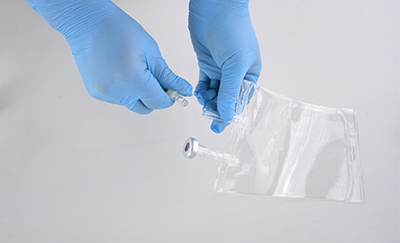
- Add clean water. Use the long-tip 60 mL syringe to fill the bag to the amount needed for the session.
- Replace the stopper. Seat it securely to prevent leakage, but do not force it deeper than necessary.
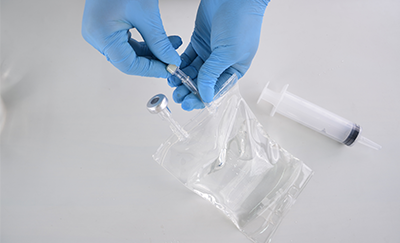
- Close the roller clamp. Closing it before inserting the drip-set spike prevents uncontrolled flow.
- Attach the drip set. Insert the spike into the fluid bag using the connection intended for the set.
- Connect the set to the model. Confirm each connector is fully seated and the tubing follows a smooth path.
- Prime the drip line. Open the roller clamp slowly until water fills the drip set and tubing. Clear major air pockets before connecting flow through the model.
- Open the model clamp. Allow water to enter the simulated vein, then use the roller clamp to adjust the practice flow.
Troubleshooting: No Flow, No Flashback, Bubbles, or Leaks
| Problem | Likely cause | What to check |
|---|---|---|
| No simulated blood flow | A clamp is closed, the bag is too low, or tubing is pinched | Raise the bag, trace every clamp from bag to outlet, and straighten all tubing |
| No flashback | Insufficient pressure, air in the vein line, a small-bore catheter, or an obstructed tube | Hang the bag higher, reprime the line, use 20G or a larger-bore catheter, and inspect the tubing path |
| Large air bubbles | The line was not fully primed or the bag ran low | Add liquid if needed, open the outlet, gently tap the tubing, and reprime until liquid reaches the vein pathway |
| Leak at the bag connector | The threaded syringe or tube connection is loose | Stop the flow, disconnect, align the threads, and reconnect firmly without cross-threading |
| Leak from another connection | A tube is not fully seated or is under sideways tension | Drain pressure, reseat the connector, and reposition the tubing so it is not pulling on the joint |
| Flow stops under the skin | The tubing is folded or pinched by the removable skin or leg-core edge | Remove the skin, inspect the full route, and reposition the tubing so the curve is open |
| Slow or uneven drip | Roller-clamp setting, trapped air, bag height, or a partial obstruction | Reset the clamp, reprime, raise the bag, and flush the tubing with clean water |
Do not force liquid through a blocked line at high pressure. Stop, release the pressure, isolate the section where flow stops, and correct the connection or tubing position before resuming.
Cleaning, Draining, Drying, and Storage
- Drain the simulated blood. Lower or disconnect the bag and let the remaining liquid leave the model through the outlet tube.
- Flush the internal tubing with clean water. Continue until the water leaving the system is clear.
- Drain again. Hold the model and tubing so water does not remain trapped at low points.
- Clean the waterproof skin with water. Wipe away simulated blood and allow the surface to dry. Do not add strong cleaners or solvents unless the manufacturer has confirmed compatibility.
- Air-dry the open system. Leave the tubing and components in a ventilated place until dry before closing the kit for storage.
- Store without sharp bends. Keep tubing relaxed, clamps released where practical, and sharp accessories separated from the model skin.
The self-sealing practice skin is designed for repeated puncture and can support hundreds of practice punctures with appropriate care. Actual service life varies with catheter size, puncture concentration, handling, cleaning, and storage. Rotate insertion sites instead of repeatedly targeting one small area.
Conclusion
A reliable dog IV practice setup depends on four checks: completely mixed liquid, secure connections, an elevated supply bag, and a fully primed tube. When flashback or flow is inconsistent, work through the system in that order instead of immediately repeating the puncture. After each session, flush with clean water, drain the tubing, and let every component air-dry before storage.
Frequently Asked Questions
Can you use real IV catheters on the dog IV practice leg?
Yes. The model supports catheter insertion and advancement. For the clearest simulator flashback, use 20G or a larger-bore catheter, such as 18G or 16G. Lower gauge numbers indicate larger internal diameters. Select catheter sizes for live patients only under the protocols of a veterinarian or veterinary training programme.
How much simulated blood powder should you use?
Start with 1 g of powder in 500 mL of clean water. The colour can be adjusted for visibility, but the powder should always be completely dissolved before the mixture enters the bag and tubing.
How many times can the dog IV model be punctured?
The practice skin is designed to self-seal after repeated needle puncture and can support hundreds of punctures under appropriate use. Lifespan is not a fixed number: larger catheters, repeatedly using one spot, poor cleaning, or storing the tubing under tension can shorten it. Rotate sites and follow the cleaning steps above.
Sources and Product Guidance
- MEDTACEDU product-team setup, catheter-compatibility, simulated-blood, cleaning, durability, and storage guidance, confirmed August 2026.
- Instructions and component photographs supplied with the Dog IV Practice Kit.
Disclaimer: This guide explains the setup and maintenance of a veterinary training simulator. It does not replace supervised veterinary education, a school’s skills protocol, or clinical guidance for live animals.
Related Canine Venipuncture Guides
Once the kit is primed and running, these guides cover the clinical technique it is meant to rehearse:
- Canine Venipuncture: Best Practices for Blood Collection — site selection, sample quality, and the overview of every collection site.
- Canine IV Catheterization — placing and securing an indwelling catheter for fluids or medication.
- Dog Jugular Vein Phlebotomy — restraint, landmarks, and step-by-step neck collection.
- Canine Lateral Saphenous Vein Blood Draw — hindlimb positioning and vein stabilization.
Training Resources
- Dog IV Practice Kit — complete setup for flashback, catheter advancement, blood draw, fluid-drip, and taping practice.
- Canine IV Training Model — dog leg model for repeated cephalic-vein access practice.
- Veterinary Cat IV Practice Kit — feline leg model for blood-draw and catheterization training.
- Browse Veterinary IV and Practice Models.