For a successful saphenous vein dog blood draw, the team must do three things well: choose a position the dog can sustain, occlude and stabilize the vein near the stifle, and keep the needle aligned with the superficial vessel. If the vein rolls, blood flow stops, or swelling develops, the safest response is to identify the failure pattern instead of repeatedly redirecting the needle.
This guide focuses specifically on the lateral saphenous vein in dogs. For broader site selection, sample planning, and comparisons with the cephalic and jugular veins, see our canine venipuncture and blood collection guide.
Important: Venipuncture is a clinical procedure for trained veterinary personnel and supervised learners. It is not an at-home blood-draw technique. Follow the responsible veterinarian’s instructions, the receiving laboratory’s requirements, and your practice’s restraint, infection-control, and sharps protocols.
When Is the Lateral Saphenous Vein a Good Site?
The lateral saphenous is a superficial hindlimb vein commonly used for canine blood collection. It can be useful when handling the rear limb is less stressful than controlling the head or a forelimb, when the dog can remain comfortably standing, or when a peripheral site is preferred over the jugular.
It is not automatically the best choice for every dog. Reconsider the site when the patient cannot safely bear weight or tolerate hindlimb handling, when the skin is infected or injured, when the vessel or surrounding tissue is already bruised, or when positioning would worsen orthopedic, neurologic, or respiratory discomfort. The required sample volume, planned tests, previous punctures, bleeding risk, and need to preserve a vein for vascular access also belong in the decision.
The site decision should be made before the needle is uncapped. If the clinical question is simply which vein to choose, use the broader canine venipuncture guide rather than turning this vessel-specific page into another general comparison.
Where Is the Canine Lateral Saphenous Vein?
The canine lateral saphenous vein is superficial on the outer, caudolateral aspect of the lower hindlimb. It is commonly approached around the distal tibial and tarsal region and courses proximally toward the area behind the stifle. Coat, loose skin, body condition, limb conformation, and venous filling can make the visible path look different from one dog to another, so palpation and response to occlusion matter more than a memorized surface line.
Virginia Tech’s canine venipuncture SOP describes applying pressure proximal to the intended puncture site, then rolling the vessel from caudal to lateral so it becomes accessible on the upper-facing aspect of the leg. This roll-and-stabilize action is one of the defining skills of lateral saphenous venipuncture in dogs.
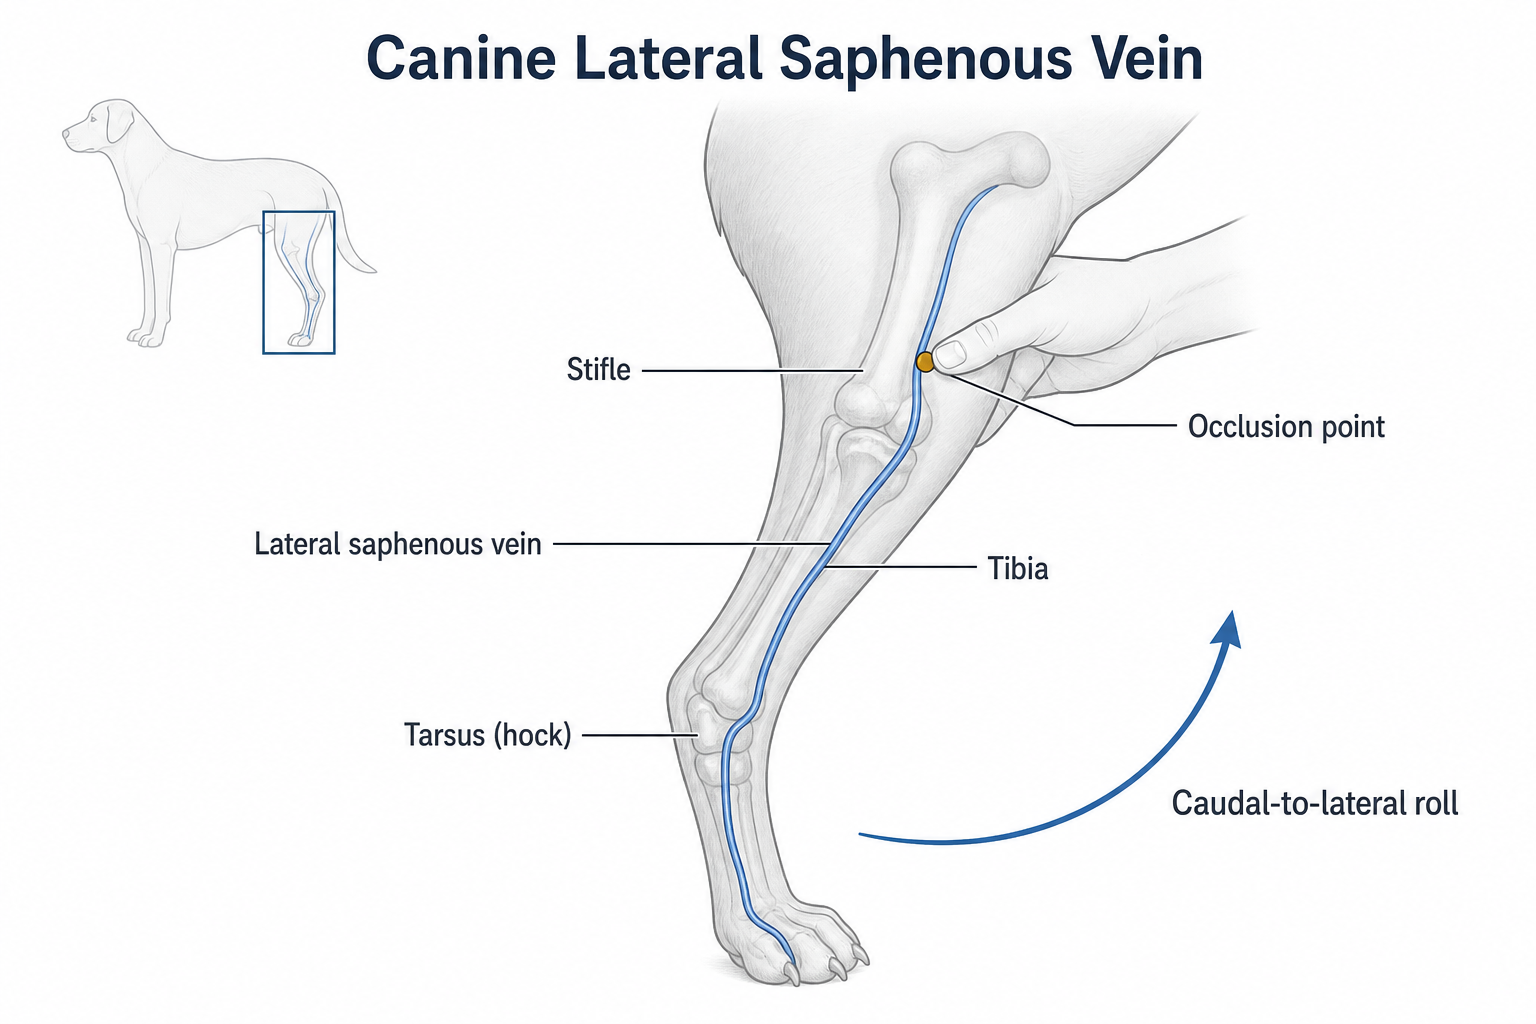
Original educational illustration showing the canine lateral saphenous vein, proximal occlusion near the stifle, and the caudal-to-lateral roll used to present the vein.
Lateral vs medial saphenous vein in dogs
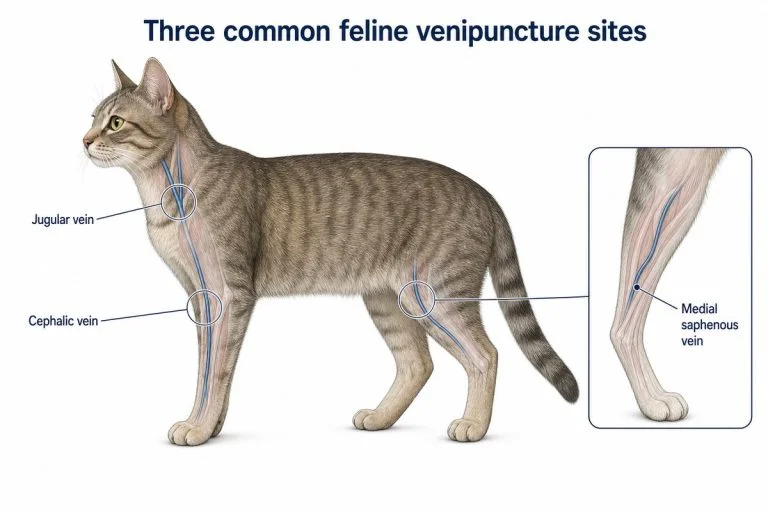
“Saphenous vein” can refer to different branches and approaches. In small-animal teaching, the lateral saphenous vein is the customary canine hindlimb blood-draw site, while the medial saphenous or femoral approach is more commonly taught for cats. The University of Guelph’s small-animal clinical skills text makes this dog-lateral and cat-medial distinction explicitly.
Dogs do have medial venous anatomy, but that does not make canine lateral and feline medial techniques interchangeable. This article does not teach feline medial saphenous venipuncture.
Choose a Hindlimb Position the Dog Can Sustain
There is no single correct position for every dog. Choose the least stressful position that gives the team stable access to the outer hindlimb without twisting a painful joint or forcing the patient to struggle. Use a non-slip surface and make sure the collector can work without crouching, reaching, or placing the needle hand in an unstable position.
Standing
Standing is often useful for dogs that resist lying down or dislike handling around the head and forelimbs. The holder supports the body so the dog cannot sit suddenly, controls the selected hindlimb without lifting it into an unnatural angle, and maintains proximal occlusion. The collector approaches from behind or beside the dog while keeping the face and torso out of a potential kick path.
The University of Minnesota’s Veterinary Clinical Skills Compendium notes that standing may suit nervous dogs that hesitate to lie down. Standing only works when both handler and patient have secure footing and the dog can remain balanced without force.
Lateral recumbency
Lateral recumbency can provide more body support for small, weak, or recumbent dogs and for patients that are calmer lying down. Virginia Tech describes positioning the intended venipuncture site on the upper leg. Support the neck, spine, hips, and lower limbs; do not stretch the dog simply to reproduce a textbook pose.
Sternal recumbency with the hips rotated laterally
Some dogs tolerate sternal support better than full lateral recumbency. The forequarters remain sternal while the hips and rear legs are gently moved to one side, exposing the outer surface of the upper hindlimb. This can be useful when a dog needs more chest support or is uncomfortable lying fully on its side.
Changing position is a clinical adjustment, not a failure. If the dog becomes more fearful, painful, dyspneic, or difficult to control, pause and let the responsible clinician select a lower-stress plan.
Holder and Collector Roles
Lateral saphenous blood collection usually requires coordinated teamwork. Before the needle is uncapped, agree on who controls the dog, who controls the rear limb, where the holder’s hands will be, and which words mean “vein occluded,” “needle entering,” “release occlusion,” and “apply pressure.” Avoid a casual release word that the dog may already recognize as permission to move.
The holder
The holder’s job is to keep the patient safe and the vessel usable, not to immobilize the dog at any cost.
- Support the head, shoulders, body, and hips according to the chosen position.
- Prevent sudden sitting, rotation, or limb withdrawal without forcing the joints.
- Apply pressure proximal to the puncture site, near the stifle, so the vein fills distally.
- Use the side of the hand and thumb to roll the vessel from caudal toward lateral.
- Slide the skin enough to create gentle tension and reduce vessel movement.
- Maintain occlusion during collection, then release it when the collector gives the withdrawal cue.
- Keep control of the limb while moving gauze over the puncture site.
The collector
The collector confirms that the vein is identifiable before exposing the needle. With the non-dominant hand, brace against the limb and place a thumb or finger beside—not over—the vein. Gentle distal skin tension can help prevent the vessel from rolling. The needle hand should also be supported against the dog or a stable surface so a small patient movement does not become a large needle movement.
Both people should be able to stop the procedure. The American Animal Hospital Association advises using the least stressful, most humane restraint and warns that forceful, complete immobilization during blood collection increases risk to both the patient and staff.
The Lateral-Specific Sequence: Occlude, Roll, Stabilize, Collect
1. Assess the patient and select the limb
Confirm the dog’s identity, required tests, required sample volume, recent puncture sites, bleeding risk, and any condition that affects positioning. Inspect both hindlimbs for bruising, edema, skin disease, pain, or a vascular device before choosing a side.
2. Set up the team and position
Place the dog on secure footing or a padded surface. Agree on the verbal sequence and confirm that gauze and the sharps container are within reach. Position the patient before opening or uncapping the needle.
3. Identify the vessel path
Part or clip the coat when needed and prepare the skin according to the test and practice protocol. Locate the superficial vessel on the lateral lower hindlimb. Palpate the path and watch what happens when proximal pressure is applied and released.
4. Occlude, roll, and stabilize
The holder applies proximal pressure near the stifle and rolls the vessel from caudal to lateral. The collector uses gentle skin tension and a stabilizing finger beside the vessel. Do not proceed until the vein can be distinguished from a tendon, skin fold, or fixed tissue edge.
5. Align the needle with the vein
Approach with the bevel up and the needle following the vessel’s long axis. Virginia Tech describes an approximately 25–30-degree entry and recommends beginning distally so a more proximal area remains available if the plan must be reset. The exact angle must still reflect the dog’s anatomy and the visible depth of the vessel.
6. Enter with a controlled movement
Pass through the skin and into the vessel with a deliberate, controlled motion. Once blood appears in the hub or syringe, stabilize the needle hand. Do not advance automatically after flashback; first confirm that the bevel remains in the lumen.
7. Collect with gentle aspiration
Use only enough negative pressure to maintain blood flow. Strong suction can pull a small or underfilled vein against the bevel. A butterfly set may give more working room in a standing dog, but the collection system should be chosen by the clinical team based on the patient, vessel, sample, and laboratory requirements.
8. Release, withdraw, and apply pressure
When the sample is complete, relax syringe suction and ask the holder to release venous occlusion before the needle is removed. Withdraw smoothly, place folded gauze over the puncture site, and maintain direct pressure until bleeding has stopped. Keep control of the dog and inspect for swelling before allowing the patient to step away.
Troubleshoot the Lateral Vein by What You See
| What you observe | What to check first | Safer response |
|---|---|---|
| Vein does not become visible or palpable | Position, proximal occlusion point, skin movement, coat, lighting, venous filling | Keep the needle capped; reset the limb and the holder’s hand before trying again |
| Vein moves away from the needle | Insufficient skin tension, stabilizing finger too far away, steep or hesitant approach | Release, re-occlude, roll the vessel laterally, and brace beside it; do not chase it under the skin |
| No flashback after entry | Vessel alignment, depth, patient movement, whether the target was truly a vein | Avoid broad blind redirection; withdraw, apply pressure, and reassess the landmark |
| Flashback appears, then flow stops | Bevel partly outside the lumen, bevel against the vessel wall, movement, excessive suction, collapse | Reduce suction and confirm alignment; make only a minimal axis-aligned adjustment if permitted by the supervised protocol |
| Syringe plunger feels resistant and the vein flattens | Excessive negative pressure or a collection system poorly matched to the vessel | Relax aspiration; reassess the system and site instead of pulling harder |
| Swelling appears around the needle | Needle has left or passed through the vessel; blood is entering surrounding tissue | Stop immediately, release occlusion and suction, withdraw, and apply direct pressure |
The vein is not filling
Do not assume that the dog has a “bad vein.” A proximal hand placed in the wrong position may compress soft tissue without occluding the vessel. Reposition near the stifle, roll from caudal to lateral, and confirm that the vessel changes with pressure and release. If the dog is standing, make sure it has not shifted weight or begun to sit.
The lateral saphenous vein keeps rolling
Rolling is a stabilization problem, not an invitation to make a wider needle sweep. Recreate gentle skin tension, brace a finger beside the vessel, support the needle hand, and align the entry with the vein’s course. If the vessel still cannot be held reliably, change the position, operator, or site rather than accumulating tissue trauma.
There is flashback but blood stops
A flash shows that the needle contacted blood; it does not prove the full bevel remains centered in the lumen. First reduce syringe suction and confirm that the dog, holder, and needle have not moved. If flow cannot be restored with a small controlled adjustment permitted by local protocol, stop and reset. Repeated probing makes the final needle position harder to understand and increases hematoma risk.
The vessel collapses
Pulling harder usually makes collapse worse. Relax the plunger, maintain steady occlusion, and determine whether the collection method matches the vein and required sample. For a small or poorly filled vessel, the clinician may choose a smaller syringe or a butterfly system that allows more controlled aspiration. Do not make equipment changes that compromise the laboratory’s required fill volume or sample ratio.
A hematoma develops
Visible or palpable swelling means the draw should stop. Release occlusion and syringe suction, withdraw the needle, and apply direct pressure without repeatedly lifting the gauze to inspect. Virginia Tech lists fewer attempts in one area, release of suction and vessel compression before withdrawal, and post-draw compression as core measures to limit hematoma and hemorrhage.
Do not puncture through a forming hematoma. Once bleeding is controlled, the responsible clinician should reassess the patient and select an undamaged site if another sample is necessary.
Skills Practice Progression
Learners benefit from separating this procedure into observable skills before attempting a complete draw:
- Landmark drill: identify the lateral lower hindlimb, tarsal region, vessel path, and proximal occlusion point without a needle.
- Positioning drill: compare standing, lateral, and sternal-with-hips-lateral setups while maintaining patient and handler stability.
- Holder drill: practise the caudal-to-lateral roll, skin tension, and the release-before-withdrawal sequence.
- Communication drill: use consistent cues for readiness, needle entry, release, and pressure.
- Needle-control drill: brace the hand, align with the simulated vessel, recognize flashback, and aspirate without excessive vacuum.
- Failure-pattern drill: deliberately simulate poor occlusion, vessel movement, interrupted flow, collapse, and swelling, then require the learner to state the stop/reset response.
Assessment should reward a reproducible process—not just whether fluid enters the syringe. A learner who identifies an unsafe setup and resets it is demonstrating better judgment than one who obtains simulated blood through uncontrolled probing.
Conclusion
Canine lateral saphenous venipuncture is a vessel-specific team skill. Success depends on choosing a tolerable position, occluding near the stifle, rolling the superficial vessel laterally, creating gentle skin tension, supporting the needle hand, and releasing occlusion before withdrawal. When the vein rolls, flow stops, the vessel collapses, or swelling appears, identify the pattern and reset rather than repeating the same movement.
Keeping those skills on one focused page allows the broader canine venipuncture guide to retain site comparison and sample-planning intent while this article answers the practical questions unique to the lateral hindlimb approach.
Frequently Asked Questions
Does a dog need sedation for a lateral saphenous blood draw?
Most calm, cooperative dogs do not require sedation for a routine blood draw. Use the least stressful position and handling method that safely permits collection. If fear, pain, aggression, respiratory compromise, or repeated struggling makes manual restraint unsafe, the veterinarian may choose pre-visit medication, anxiolysis, sedation, a different site, or a later attempt. Sedation is an individualized clinical decision, not a routine step for every dog.
Can the lateral saphenous vein be used for IV catheter placement in dogs?
Yes. Virginia Tech lists both the cephalic and lateral saphenous veins as canine peripheral IV catheter sites. Catheter placement is a separate procedure with additional aseptic preparation, catheter advancement, securement, flushing, and monitoring requirements. For that workflow, see How to Place a Canine IV Catheter.
Can the same site be used again after a hematoma develops?
Do not collect through a forming hematoma or continue puncturing the damaged area. Stop, release occlusion and suction, remove the needle, and maintain direct pressure until bleeding is controlled. If another sample is necessary, the clinician should reassess the dog and choose an undamaged area or another vein according to the patient’s condition and local protocol.
Sources
- Virginia Tech — SOP: Venipuncture in Dogs and Cats
- University of Minnesota — Dog Restraint for Lateral Saphenous Blood Draw
- University of Guelph — Small Animal Clinical Skills: Peripheral Veins
- Cornell University College of Veterinary Medicine — Comparative Coagulation Sampling Instructions
- American Animal Hospital Association — Humane Restraint of Animals
- Virginia Tech — SOP: Placing an Intravenous Catheter in Dogs and Cats
This article is for veterinary education and supervised clinical training. It does not replace patient-specific assessment, laboratory instructions, or hands-on instruction by a veterinarian or qualified veterinary professional.
Training Resources
For repeatable practice of hindlimb positioning, vessel stabilization, needle alignment, and simulated blood return, use MEDTACEDU’s Canine Leg Injection Trainer for IM Injections & Saphenous Vein Blood Collection. Educators can split practice into landmark, holder, collector, and failure-pattern stations before learners work with live patients under supervision. Explore all Veterinary IV & Practice Models.