A wound can look packed and still be uncontrolled. This guide helps instructors recognize ten distinct failure patterns—not ten variations of “the learner packed it wrong.” By the end, you will be able to separate a poor method choice from a missed source, a loose fill, a pressure break, and a failed reassessment, then give one correction the learner can test immediately.
The Four Questions Behind Every Failed Attempt
Before correcting hand position, identify which question the attempt failed:
- Should this simulated wound be packed?
- Is pressure directed at the simulated bleeding source?
- Is the cavity being filled without losing pressure?
- Did control remain effective after reassessment or movement?
These four questions create a memorable sequence: choose, target, fill, verify. They also keep instructors from treating every failure as a reason to add more gauze.
Step 1 — Choose the Method
Mistake 1: Treating Every Deep-Looking Wound as Packable
This error happens before the gauze enters the model. The learner sees an open wound and reaches for packing material without considering location, wound shape, the recognized course protocol, or whether direct pressure or a limb tourniquet is the taught response.
The giveaway: the learner can describe how to pack but cannot explain why packing fits this scenario.
Correction: Place different wound locations and bleeding-control options in the same drill. Require one sentence before action: “I am choosing this method because…” A correct technique applied to the wrong scenario is still a failed decision.
Step 2 — Target the Simulated Source
Mistake 2: Packing the Opening Instead of the Simulated Source
Once the scenario has been identified as packable, the next task is to direct the first pressure where the simulated flow originates. Beginners often aim at the center of the visible opening because it is easy to see. The result may look full from above while fluid continues beneath the gauze.
The giveaway: leakage keeps following the same path even as more material is added.
Correction: Pause before the first feed and ask, “Where is the strongest simulated flow?” Have the learner identify the target and place the first section of gauze there. This is a targeting problem, not a method-selection problem.
Mistake 3: Covering the Surface Instead of Filling the Cavity
A surface dressing and wound packing are not interchangeable. Gauze laid across the opening may hide the cavity without occupying it, leaving the deep space empty and direct pressure absent.
The giveaway: most material remains above the simulated skin line and lifts away as one pad.
Correction: Use a cross-sectional demonstration first, then repeat the drill with the cavity hidden. Ask the learner to state the difference in one phrase: “covering protects the surface; packing progressively fills the taught cavity.”
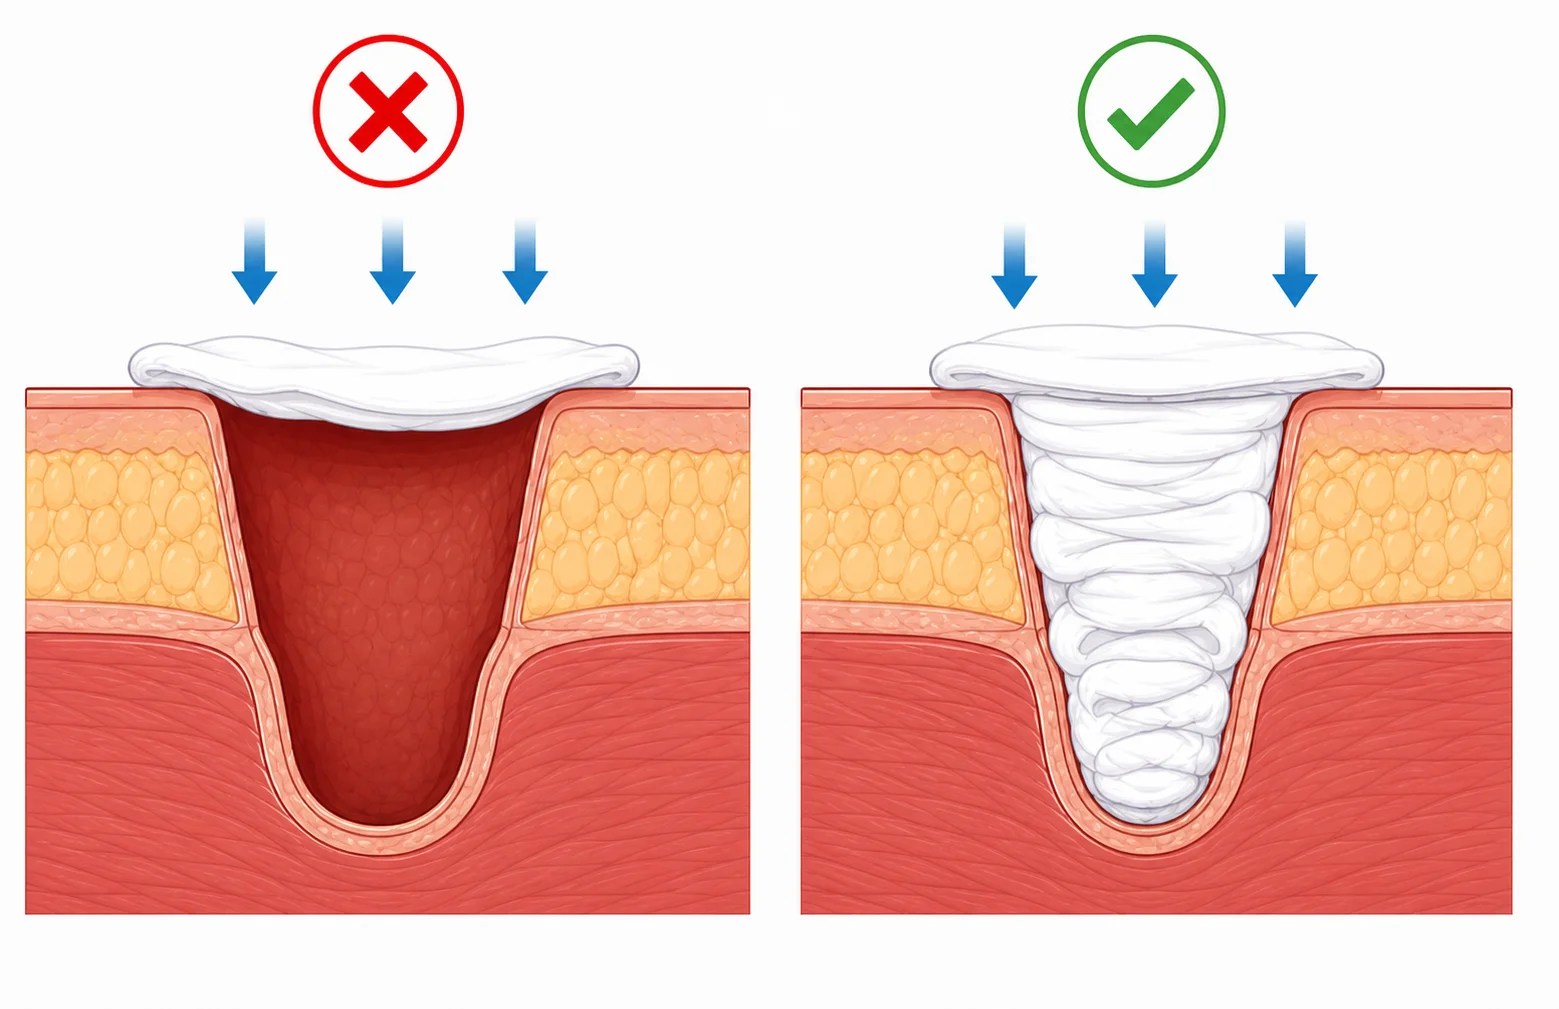
Surface coverage can hide an empty cavity; progressive filling creates a compact pack.
Step 3 — Fill the Cavity and Maintain Pressure
Mistake 4: Packing Loosely and Leaving Voids
Loose loops can occupy volume without forming a compact mass. In a flow-enabled trainer, those empty channels give simulated blood a path around the gauze.
Do not correct this with the vague instruction “pack harder.” Show one loose and one compact cross-section, then ask the learner to identify where the channel formed. The successful attempt is progressively filled and remains stable when the model is moved.
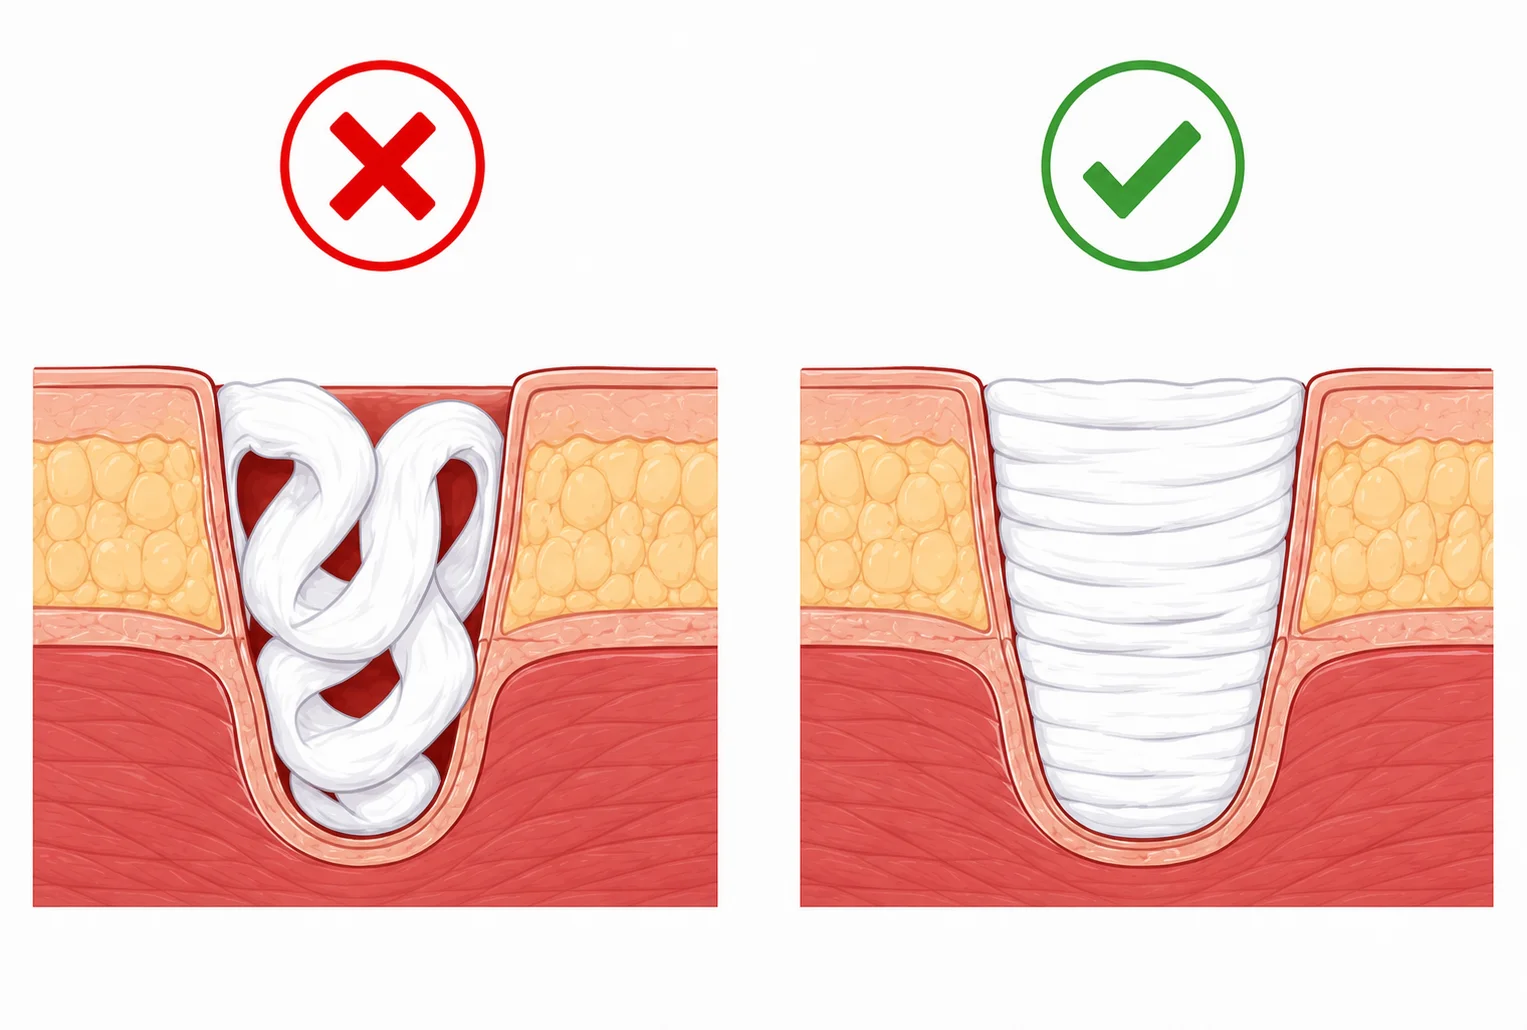
Loose loops leave channels; compact layers remove visible voids in the trainer.
Mistake 5: Losing Pressure During the Gauze Handoff
The first placement may be correct, yet the attempt fails each time the learner reaches for more material. If both hands leave the pressure point, the existing gauze can loosen and flow can resume.
A useful slow drill: one finger stays on the packed material while the other hand feeds the next section. Speed returns only after the learner can maintain that continuity without prompting.
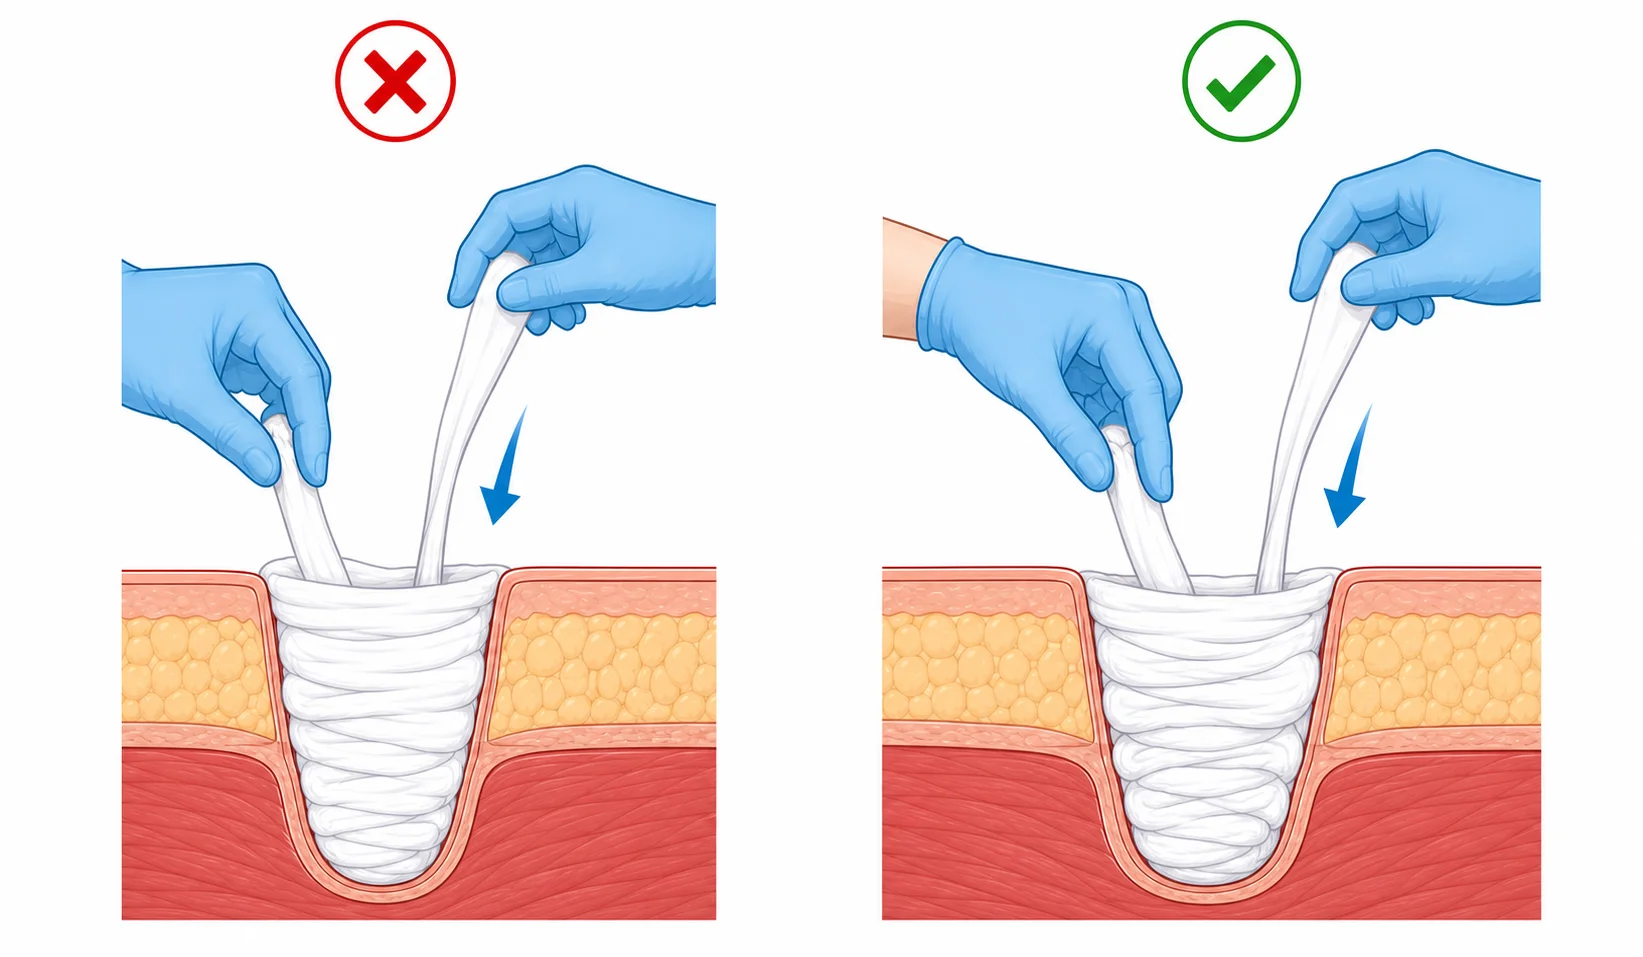
During the handoff, keep pressure on the packed material while the other hand feeds the next section.
Mistake 6: Stopping When One Gauze Roll Is Empty
An empty package is an equipment event, not a clinical or training endpoint. The model may still contain unfilled space or show continued simulated flow. NAEMT training material notes that more than one roll may be required.
Change cavity size between attempts and keep additional training gauze within reach. Ask, “What is finished—the package or the task?” The learner should stop because the taught endpoint has been achieved, not because the wrapper is empty.
Mistake 7: Lifting the Pack to Check Too Soon
Some learners repeatedly peek beneath the gauze. Each check interrupts pressure and can undo an otherwise effective attempt. It also replaces a course-defined reassessment process with curiosity about appearance.
Set the reassessment rule before the attempt begins and follow the recognized course and product instructions. Questions asked during the pressure interval should be answerable without lifting the intervention.
Step 4 — Verify the Result
Mistake 8: Adding Gauze Without Diagnosing Continued Flow
More material will not fix every failure. Continued simulated bleeding may come from a missed source, surface-only coverage, a void, a broken handoff, or an unsuitable method. Adding gauze in the same place simply hides the diagnosis.
Use three prompts: “What do you observe? What most likely caused it? What one change will test that explanation?” The learner should change the suspected cause, then check whether the result changes.
Mistake 9: Making the Instructor the Only Feedback System
If “good” or “wrong” arrives before the learner reads the model, the learner begins watching the instructor instead of the outcome. A flow-enabled trainer, visible leakage path, movement test, or another predefined signal should carry part of the feedback.
Delay your verdict and ask, “What is the model telling you?” The memorable moment is not the instructor naming the error; it is the learner connecting an observable result to a specific action.
Mistake 10: Ending the Scenario as Soon as Flow Stops
Bleeding control is something to maintain, not a finish buzzer. Packing that appears stable on a table may shift during movement, transfer, or handoff.
End the drill with one final event: reposition the model, restart a small controlled flow, or transfer responsibility to another learner. A complete handoff states the wound location, method used, observed result, reassessment, and any unresolved problem.
A Short Instructor Correction Loop
When an attempt fails, avoid replaying the entire lecture. Use one loop:
| Step | Instructor prompt | Learner action |
|---|---|---|
| Observe | “What changed in the model?” | Names the visible or tactile failure signal |
| Explain | “What most likely caused it?” | Links the signal to one decision or action |
| Correct | “What will you change first?” | Tests one focused correction |
| Verify | “What result would show it worked?” | Checks control and stability |
The loop is deliberately short. It turns the simulator from a container for gauze into a source of evidence.
Conclusion
The most useful way to remember wound packing errors is not as ten isolated rules. Follow the attempt in order: choose the method, target the source, fill while maintaining pressure, and verify that control lasts.
When an attempt fails, name the failure signal before naming the correction. That single habit prevents repetitive feedback and helps learners build a troubleshooting skill they can apply across different supervised scenarios.
Frequently Asked Questions
Can plain gauze be used for wound packing practice?
Yes. NAEMT’s wound-packing skill-station material states that plain gauze is acceptable for classroom simulation of a hemostatic agent. Clearly label training-only supplies and do not imply that simulation gauze is a clinical hemostatic product.
How should an instructor score a wound packing attempt?
Score the decision and the maintained result, not the final appearance alone. Useful criteria include selecting the taught method, targeting the simulated source, filling the cavity compactly, maintaining pressure, responding to failure, reassessing, and communicating a handoff. Adapt the rubric to the recognized curriculum and local protocol.
Does a wound packing trainer need active simulated bleeding?
Active flow is not required to introduce hand position and sequence, but it can make leakage, pressure loss, and correction visible. Without active flow, define another consistent outcome before the drill begins. A simulator alone does not certify clinical competence.
Sources
- American Heart Association and American Red Cross: 2024 Guidelines for First Aid
- American College of Surgeons: ACS Stop the Bleed Course FAQ
- National Association of Emergency Medical Technicians: Bleeding Control Skill Stations
- Wounds International: Ten Top Tips—Common Wound Errors and Means to Correct
- StrideCare: 7 Common Wound Care Mistakes and How to Avoid Them
Medical disclaimer: This article is for instructor-led education and simulation design. It does not replace certified first-aid or trauma training, current course materials, emergency-dispatch instructions, local medical direction, device instructions, or professional care. Severe or uncontrolled bleeding is a medical emergency. Ensure scene safety, activate emergency services, and act only within the scope of your training.
Training Resources
Wound packing trainers can provide a repeatable cavity, training gauze, and an observable simulated-bleeding response without placing a patient at risk. Match the trainer to the learning objective: basic hand coordination, laceration or gunshot-wound packing, junctional scenarios, wearable team drills, or combined packing and tourniquet practice.
For correction drills, the 2-in-1 Multitask Wound Packing Kit puts a puncture wound and a laceration in one model, and the Wearable Leg Wound Packing Trainer can be worn on the thigh or arm, with a simulated bleeding line for scenario practice.