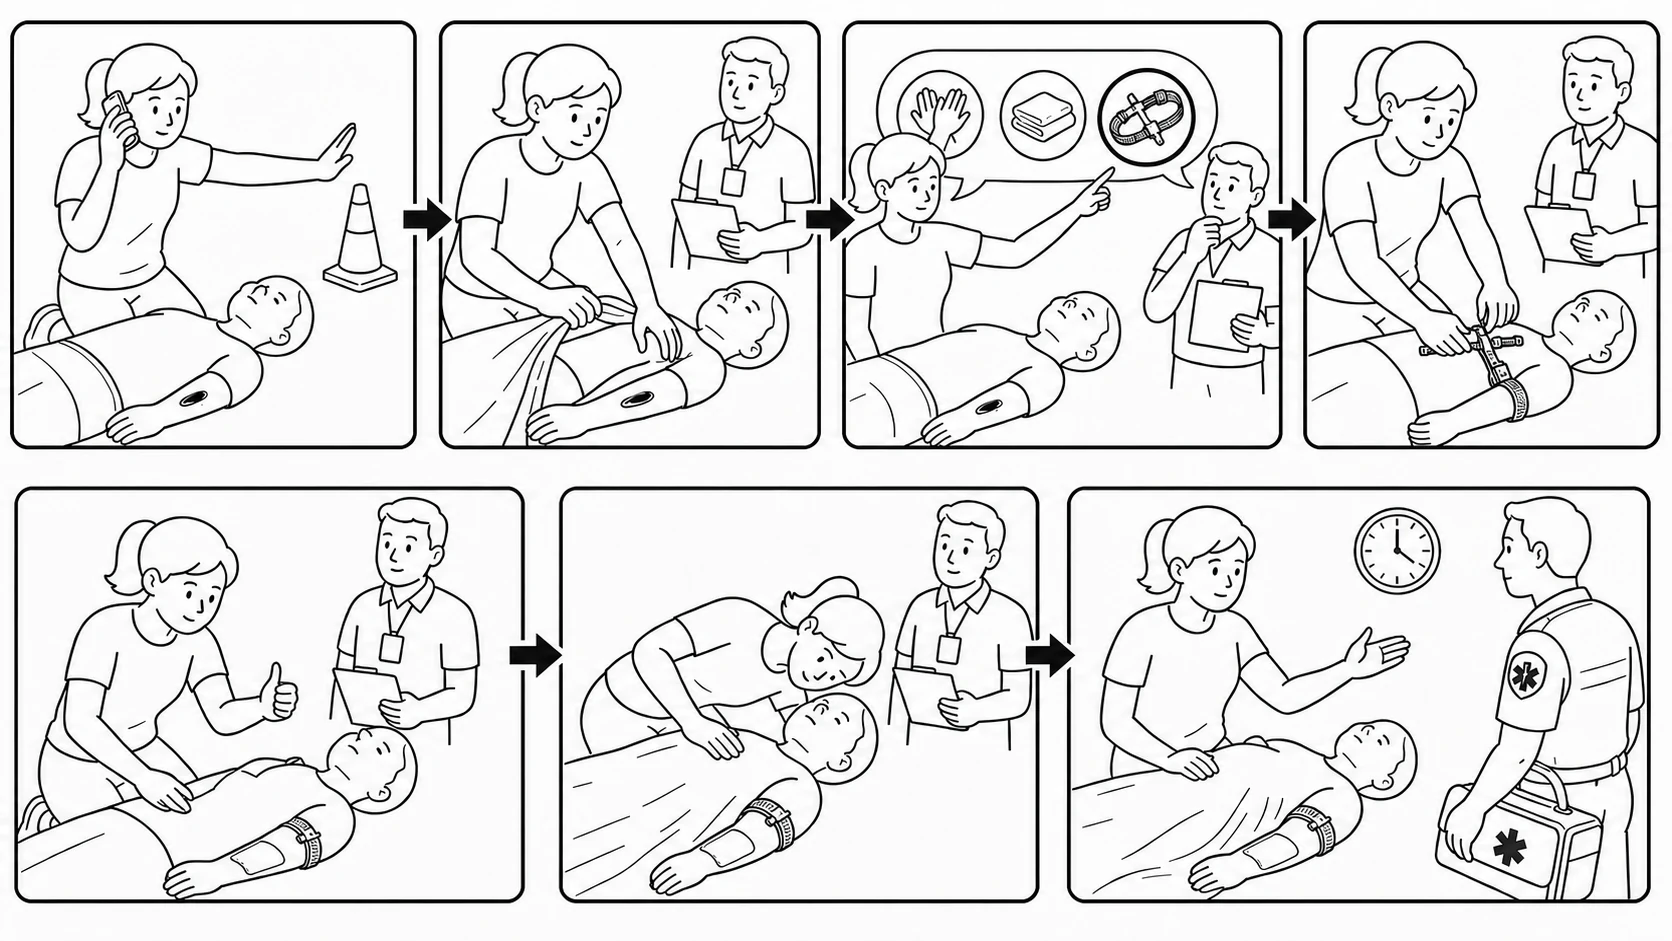
Use this seven-step bleeding control training checklist to assess a complete response: make the scene safe and activate help; expose the wound; choose direct pressure, wound packing, or a limb tourniquet; perform the selected method; confirm that bleeding stopped; reassess the person; and give a clear handoff. This article is an educational framework, not a substitute for certified first-aid or trauma training.
A learner can apply a tourniquet or pack a wound and still fail the scenario. The response is incomplete if the method does not fit the injury, simulated bleeding continues, or nobody reassesses the person.
This guide gives instructors a practical sequence to observe and correct. It starts with the first look at the scene and ends with a clear handoff.
Step 1: Check Safety and Activate Help
The learner checks whether the scene is safe, uses personal protective equipment when available, and forms an initial impression. For life-threatening bleeding, someone should contact emergency services and bring the appropriate kit while immediate care begins.
Do not let equipment preparation delay pressure on the wound. Closed-loop communication is stronger than calling out to an unidentified group: the learner assigns a specific person to call and asks for confirmation.
What the Instructor Watches
- Did the learner identify any simulated hazard?
- Did they activate help early?
- Did they avoid delaying immediate pressure while opening equipment?
- Did they give a specific person a clear task?
Step 2: Expose the Injury and Find the Source
Blood on clothing may not be directly over the wound. The learner exposes enough of the simulated injury to locate the source and checks for more than one wound.
They also identify the location. A standard limb tourniquet cannot treat bleeding from the neck, chest, abdomen, shoulder/armpit, or groin. A deep junctional wound may require trained wound packing and firm pressure. Severe bleeding farther down an arm or leg may be suitable for a commercial limb tourniquet.
What the Instructor Watches
- Did the learner find the wound rather than press on a bloodstain?
- Did they check for additional injuries?
- Did they distinguish a limb wound from a junctional or torso wound?
- Did they recognize that a small opening may lead into a deep cavity?
Step 3: Choose the Method That Fits the Wound
The learner chooses based on severity, depth, and location—not on which tool is easiest to reach.
- Direct pressure: an accessible external wound that can be compressed.
- Wound packing with firm pressure: an appropriate deep wound where pressure must reach the bleeding source and the learner’s training covers packing.
- Commercial limb tourniquet: life-threatening bleeding from an arm or leg where the device can be placed above the wound and away from a joint.
The method-selection guide explains these differences in more detail.
What the Instructor Watches
- Did the learner explain why the method fits the wound?
- Did they avoid using a limb tourniquet on a junctional or torso injury?
- Did they change plans if the first method could not reach the source?
Step 4: Perform the Selected Technique
The instructor assesses the method taught by the recognized course and current device instructions.
Direct Pressure Station
The learner places firm pressure directly over the source and maintains it. They avoid repeatedly lifting the dressing to check, because that interrupts pressure.
Wound Packing Station
The learner finds the source inside the appropriate wound cavity, packs gauze into the space, and maintains firm pressure. Gauze placed only over the opening does not fill the wound.
Tourniquet Training Station
The learner places a commercial training tourniquet above the wound, not over the injury or a joint. They tighten it according to the course and device instructions until simulated life-threatening bleeding stops, then secure the device and record the time when possible.
What the Instructor Watches
- Did pressure reach the bleeding source?
- Was the cavity filled rather than covered?
- Was the tourniquet positioned and tightened effectively?
- Did the learner keep working until the simulator showed a result?
Step 5: Confirm That the Intervention Worked
This is the most important checkpoint: did simulated life-threatening bleeding stop?
The learner looks at the source, not only the equipment. If blood continues to flow, the intervention needs correction. Possible causes include pressure in the wrong place, incomplete packing, a loose tourniquet, or a method that does not fit the wound.
Ask the learner to identify the likely cause, choose a correction, and check again. This turns a failed attempt into a troubleshooting exercise.
A Better Instructor Prompt
Instead of saying “That is wrong,” ask:
- What do you observe now?
- What does that result tell you?
- What will you change?
- How will you confirm the change worked?
What the Instructor Watches
- Did the learner check the simulated flow?
- Did they recognize failure without waiting for the instructor to announce it?
- Did the correction address the likely cause?
- Did they verify the result again?
Step 6: Reassess the Person, Not Just the Wound
Stopping the first visible bleed does not end the response. The learner rechecks bleeding, intervention security, breathing, responsiveness, and any additional injuries within the scope of the scenario.
The instructor can restart simulated flow after movement or reveal a second wound. The learner should notice the change and act instead of assuming the first result will remain stable.
What the Instructor Watches
- Did the learner look for renewed bleeding?
- Did they check that packing, pressure, or the tourniquet remained secure?
- Did they monitor responsiveness and breathing?
- Did they protect the person from temperature extremes and continue waiting for help?
Step 7: Give a Clear Handoff
The learner reports what the next responder needs to know:
- wound location and severity;
- intervention used;
- whether bleeding stopped;
- any correction required;
- tourniquet time, when relevant; and
- changes found during reassessment.
“Tourniquet applied” is not enough. A useful handoff states the result and any remaining problem.
What the Instructor Watches
- Did the learner describe the wound and the intervention?
- Did they report whether it worked?
- Did they include relevant timing and changes?
- Did they communicate any uncontrolled bleeding or other concern?
Instructor Bleeding Control Skills Checklist
This table is a teaching aid, not an official ACS, Red Cross, or certification scoring sheet. Adapt it to the current curriculum, device, learner role, and local protocol.
| Phase | Observable performance | Critical error to correct |
|---|---|---|
| Safety and activation | Checks safety, uses PPE when available, calls for help | Enters an unsafe scene or delays immediate pressure |
| Source identification | Locates the source and checks for other wounds | Treats a bloodstain without finding the injury |
| Method selection | Matches pressure, packing, or a limb tourniquet to the wound | Uses a limb tourniquet on a junctional or torso wound |
| Technique | Performs the selected method according to training | Leaves pressure, packing, or a tourniquet ineffective |
| Effect check | Confirms that simulated bleeding stopped | Declares success while flow continues |
| Correction | Improves or changes an ineffective intervention | Waits passively after failure |
| Reassessment | Rechecks bleeding, security, responsiveness, and other injuries | Stops observing after the first action |
| Handoff | Reports injury, method, effect, timing, and changes | Reports only the equipment name |
A learner should not pass solely because every box was touched once. Unsafe method selection or uncontrolled bleeding needs correction and another observed attempt.
Build a Training Station That Shows the Result
Hemorrhage control kits provide equipment. The station also needs a way to show whether the learner’s action worked.
Useful components include:
- training tourniquets that match the organization’s devices;
- training gauze and gloves;
- a simulator with an appropriate wound cavity;
- adjustable simulated flow;
- mixed scenario cards; and
- a short observation and handoff record.
Do not announce the correct tool in the scenario title. Describe the injury, provide several options, and require the learner to choose.
Add Difficulty by Changing the Decision
More noise does not automatically make training better. Add difficulty only when it tests a defined objective.
- Start with one visible wound and one clearly appropriate method.
- Mix several wound locations and provide all three methods.
- Make the first intervention incomplete so the learner must correct it.
- Restart bleeding or reveal a second wound during reassessment.
- Add a team handoff after the individual sequence is stable.
After each scenario, ask what the learner noticed, why they chose the method, what showed it worked, and what they would change.
Conclusion
Effective bleeding control training is a loop: assess, choose, act, verify, reassess, and communicate.
The learner must do more than touch the correct equipment. They must match the method to the wound, stop simulated bleeding, correct failure, continue monitoring, and give a clear handoff.
Once learners can complete this sequence, use short refresher sessions to check whether those skills remain usable over time.
Frequently Asked Questions
Can online bleeding control training replace hands-on practice?
Online learning can review recognition, decisions, and sequence. It cannot show whether pressure is effective, a wound is fully packed, or a tourniquet stops simulated bleeding. Use it as preparation, then complete supervised hands-on practice.
Should every learner practice all three methods?
ACS Stop the Bleed teaches direct pressure, wound packing, and tourniquet application. Practicing each method builds technique. Mixed scenarios then test whether the learner can choose correctly.
What should an instructor check after a tourniquet is applied?
Check the outcome first: simulated life-threatening bleeding should have stopped. Also check that the device is above the wound, not over it or a joint, is fully tightened and secured, and is reassessed after movement.
References & Clinical Sources
- American College of Surgeons, ACS Stop the Bleed. Get Trained.
- American College of Surgeons, ACS Stop the Bleed. Frequently Asked Questions.
- American Red Cross. Bleeding (Life-Threatening External).
- American Red Cross. How to Apply a Tourniquet.
Medical disclaimer: This article is for general education and training design. It does not replace an ACS Stop the Bleed course, certified first-aid or trauma training, emergency-dispatch instructions, current local protocols, device instructions, or professional medical care. Severe or uncontrolled bleeding is a medical emergency. Make sure the scene is safe, activate emergency services, and act within the scope of your training.
Training Resources
The MEDTACEDU Hemorrhage Control Arm Simulator with Electric Pump supports instructor-led practice across multiple upper-limb wound scenarios. Controllable simulated bleeding lets learners see whether pressure, wound packing, or tourniquet application stopped the flow. The reusable arm also supports correction and repeat attempts.