A chest drain insertion places a tube through the chest wall into the pleural space to evacuate air, blood, or fluid. Safety is decided before the blade touches skin: the correct side, a site inside the triangle of safety, and a tract passing over the top of a rib rather than under it.
This article covers landmarks, positioning, the insertion sequence, securing, and immediate post-insertion checks. It does not cover suction settings, air-leak interpretation, water-seal management, ongoing nursing care, or drain removal. For the emergency that often precedes a drain, see tension pneumothorax signs and symptoms; for the temporising step before definitive drainage, see needle decompression sites and technique.
Important: Chest drain insertion is an invasive procedure with potentially serious complications. It must be performed by appropriately trained clinicians, or by supervised learners, under local protocols with resuscitation and escalation support available. This article is professional education, not a substitute for credentialing or hands-on training.
1. Before You Start
- Confirm patient identity, correct side, indication, insertion mark, consent where the situation allows, and who will be called if the procedure deteriorates.
- Prepare the kit: monitoring, oxygen and resuscitation readiness, sterile field and drapes, local anaesthetic, drain set, sutures and dressing, and a drainage system assembled and primed before the incision.
- Choose the drain deliberately. The two common routes differ in more than size:
| Route | Typical context | Principal insertion risk |
|---|---|---|
| Small-bore, guidewire (Seldinger) | Pleural fluid, many non-trauma pneumothoraces | Guidewire or dilator misplacement; no tactile confirmation of the pleural space |
| Larger-bore, blunt dissection | Trauma, haemothorax, thick or clotted material | Injury during dissection if the tract strays from the rib margin |
Size is decided by the material being drained, ventilation status, trauma physiology, local protocol, and operator competence — not by a universal default.
Never advance a drain by thrusting a trocar. Forceful blind advancement causes most catastrophic organ injuries in this procedure.
Image guidance is standard for fluid or uncertain anatomy, but must not delay treatment of a tension pneumothorax.
2. Position the Patient
Place the patient semi-recumbent or sitting forward, with the arm on the affected side raised or supported behind the head. This opens the lateral chest wall and brings the triangle of safety into reach. Supine or lateral positioning may be necessary depending on the patient’s condition.
Re-confirm the mark once the patient is in the final position. A site marked with the arm down no longer sits over the same intercostal space once the arm is raised.
Clean and drape the site, then infiltrate local anaesthetic through every layer the tract will cross: skin, subcutaneous tissue, periosteum, intercostal muscle, and parietal pleura.
As the needle reaches depth, aspirate. Air or fluid confirms the planned tract reaches the pleural space. If nothing is aspirated, stop and reassess the site, the depth, and the diagnosis.
3. Find the Triangle of Safety
The triangle of safety is the area of chest wall carrying the lowest risk to underlying structures. Its borders:
- Anterior: lateral border of pectoralis major
- Posterior: anterior border of latissimus dorsi
- Inferior: approximately the fifth intercostal space
- Apex: below the axilla
Establish the inferior limit from current anatomy, available imaging, and local protocol. The nipple is unreliable across body habitus and sex, and should not be used as a fixed landmark.
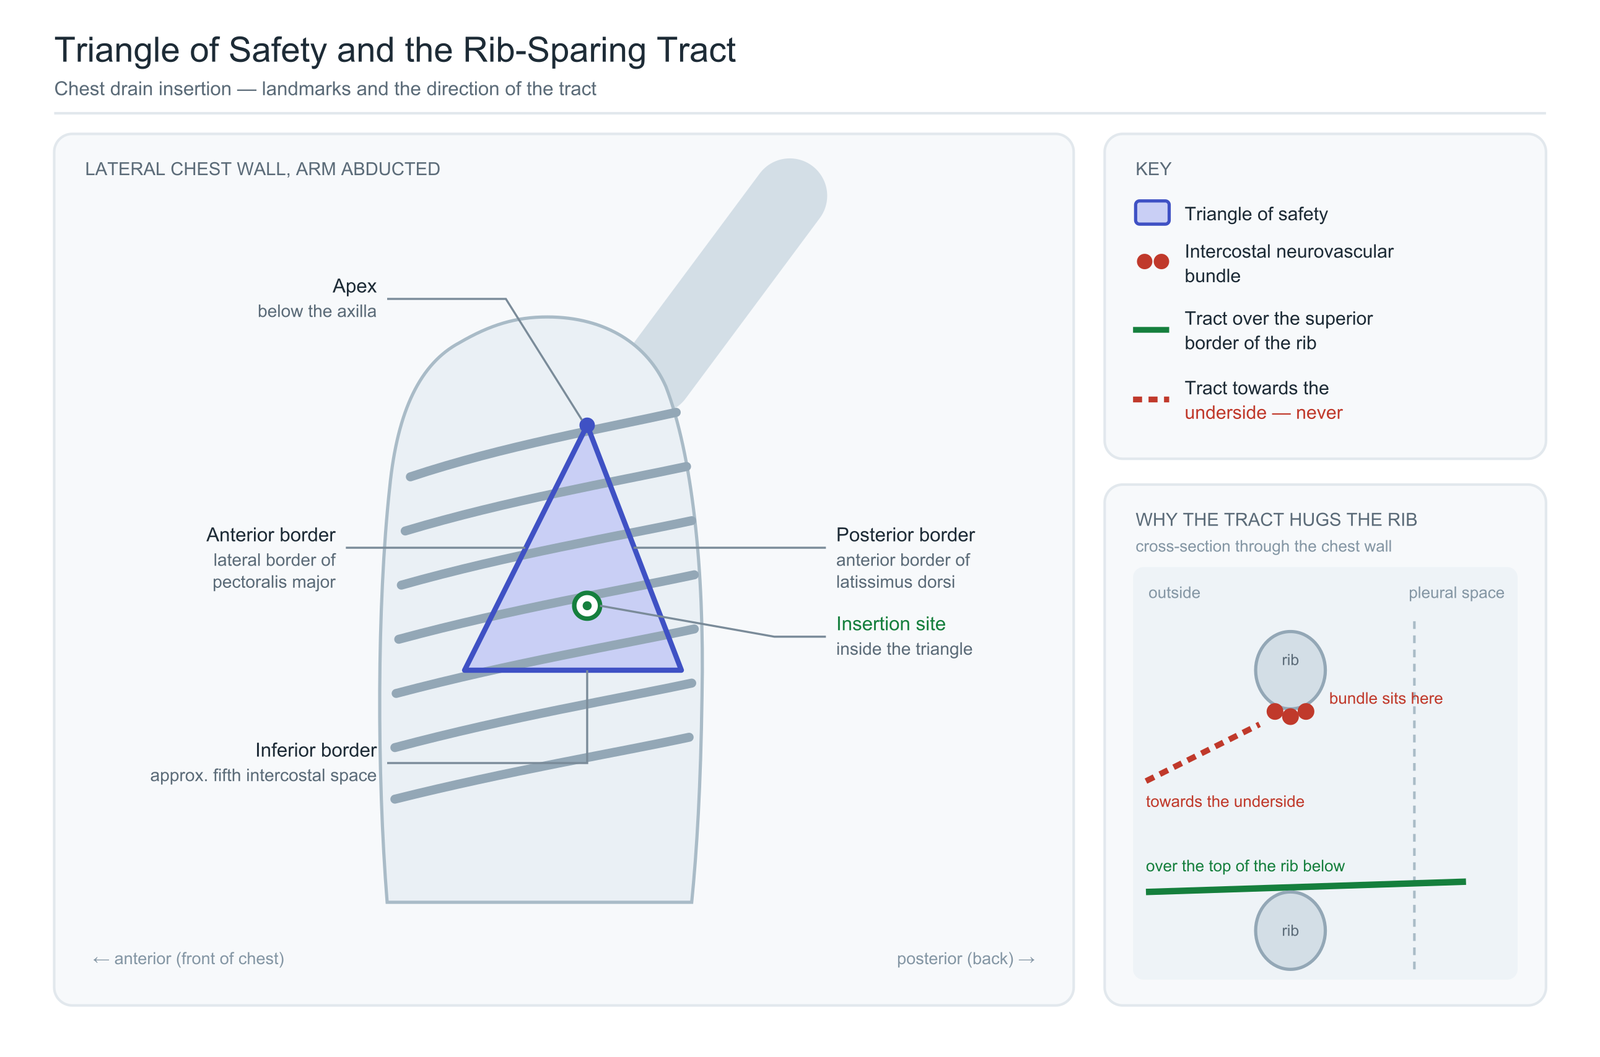
Why the tract passes over the rib
The intercostal neurovascular bundle — vein, artery, and nerve — runs along the inferior margin of each rib. A tract angled towards the underside of a rib heads directly for that bundle.
The tract is therefore aimed over the superior border of the rib below the chosen intercostal space. This principle governs the incision, the direction of dissection, and the final angle of advancement.
4. The Insertion Sequence
Step 1 — Incision over the rib
Make a 2–3 cm incision parallel to the rib at the marked site, through skin and subcutaneous tissue, positioned over the superior border of the lower rib. The incision sets the angle for every step that follows and cannot be corrected later by force.
Step 2 — Blunt dissection through the chest wall
Dissect with closed forceps: spread, withdraw, re-enter along the same tract. The movement is controlled spreading, never pushing. Stay hugging the top of the rib as the tract deepens through intercostal muscle.
Pleural entry is usually felt as a distinct give-way or “pop” as resistance drops. Treat it as the signal to stop and confirm, not as permission to push further. If depth, anatomy, or pleural entry remains uncertain, stop and reassess.
Step 3 — Finger sweep
Introduce a finger through the tract into the pleural cavity. This confirms you are in the pleural space, sweeps for adhesions between lung and chest wall around the tract, and keeps the opening controlled while the drain is prepared.
The finger sweep belongs to the blunt-dissection route only. A small-bore Seldinger insertion has no tract wide enough to admit a finger, and relies on the guidewire and imaging instead.
Step 4 — Direction and depth
Advance the drain along the prepared tract without force. If the tube will not pass, the problem is the tract — re-dissect rather than push harder.
Every side hole must lie inside the pleural cavity. A side hole left subcutaneously causes surgical emphysema and a drain that never functions properly. It is the most common depth error in this procedure.
Do not aim the tube medially. Apical-for-air and basal-for-fluid is conventional teaching but is not reliably achievable.
Step 5 — Connect immediately
Connect the drain to the prepared closed drainage system before releasing it. The tube must never be left open to atmosphere.
Step 6 — Secure and record
Place a stay suture and dressing according to local protocol, with knots tied at the base of the drain so the tube cannot slide. Record the external depth marking at skin level and the suture type, so later migration is measurable.
Do not place a purse-string suture; it is no longer recommended.
5. Immediate Confirmation
At the bedside
Reassess respiratory rate and effort, oxygenation, pain, vital signs, drainage volume and appearance, and every connection in the circuit. Confirm the fluid level swings with respiration, indicating a patent drain communicating with the pleural space. Check that no side hole sits subcutaneously and that the tube is neither kinked nor displaced.
Position and documentation
A chest radiograph is generally obtained within a few hours of insertion to confirm intrathoracic position, unless an emergency pathway specifies otherwise.
Document the indication, side and site, technique and drain size, insertion depth at the skin, output appearance and volume, securing method, any complication, the imaging plan, and a named contact for escalation.
Stop and escalate
Stop and reassess rather than persist if there is: no air or fluid on test aspiration, unexpected resistance during dissection, anatomy that does not match expectation, uncontrolled bleeding, severe pain despite anaesthesia, sudden deterioration, or any uncertainty about placement.
6. Insertion Errors and Complications
| Error | Early clue | Prevention | Immediate action |
|---|---|---|---|
| Wrong site or side | Mark does not match imaging at time-out | Time-out with imaging displayed; re-check after positioning | Stop before incision; re-verify side |
| Subcutaneous placement | Surgical emphysema, no swing, poor drainage | Confirm pleural entry by touch before advancing | Do not reposition the same tube; reassess and replace |
| Tube malposition | Poor drainage, unexpected position on radiograph | Follow the prepared tract; avoid medial angulation | Imaging review and senior input |
| Intercostal vessel injury | Brisk bleeding through or around the tube | Keep the tract over the superior rib border | Direct pressure, resuscitation, urgent escalation |
| Lung or organ injury | Pain out of proportion, bleeding, deterioration | Blunt dissection only; never a trocar thrust | Immediate escalation and imaging |
| Early dislodgement | Depth marking has moved; drainage stops | Stay suture with knots at the drain base; record depth | Reassess position; do not reinsert the same tube |
| Re-expansion pulmonary oedema | Cough, breathlessness after rapid drainage | Controlled drainage of large effusions | Stop drainage, support oxygenation, escalate |
Air-leak troubleshooting, blocked drains, suction decisions, dressing changes, infection surveillance, and removal fall outside insertion and are not covered here.
7. Practising the Sequence in Simulation
Build a checklist that mirrors the procedure: time-out, final positioning, triangle palpation, identification of the correct rib margin, controlled dissection, confirmation of pleural entry, depth check with all side holes internal, closed-system connection, securing, reassessment, documentation.
Assess two non-technical elements alongside the manual steps: named stop points — can the learner say aloud what would make them stop? — and closed-loop communication with whoever manages the drainage system.
Two parts of this procedure are tactile judgements that reading cannot teach: the give-way as the pleura is entered, and what a finger sweep feels like. Both need repetition on a trainer first.
Conclusion
Safe insertion follows a short chain: the right patient and side, a site inside the triangle of safety, a tract over the superior rib border, controlled dissection to a confirmed pleural entry, a depth placing every side hole inside the chest, a closed system connected before the tube is released, and immediate reassessment with documented findings.
When any link is uncertain, stop and reassess. Force is never the answer to resistance in the chest wall.
Frequently Asked Questions
Is chest drain insertion painful, and how is the pain controlled?
Chest drain insertion is a recognised painful procedure, and inadequate analgesia is a well-documented quality problem. Local anaesthetic must reach every layer the tract crosses — skin, subcutaneous tissue, periosteum, intercostal muscle, and parietal pleura — because infiltrating skin alone leaves the most sensitive structures unanaesthetised. Even with an adequate block, patients still feel pressure and pulling, which is worth explaining beforehand. Systemic analgesia or procedural sedation may be appropriate depending on the patient and local protocol.
Is imaging needed before a chest drain is inserted?
For pleural fluid, yes: ultrasound guidance is standard practice and reduces misplacement. The site should be marked in the same position the patient will be in for the procedure, since a mark made in a different position no longer corresponds to the same intercostal space. Imaging is also indicated whenever the anatomy or the location of the collection is uncertain. The exception is an immediately life-threatening tension pneumothorax, where treatment must not wait for imaging.
Are there situations where a chest drain should not be inserted?
Coagulopathy or therapeutic anticoagulation, a lung known or suspected to be adherent to the chest wall, extensive pleural adhesions, and previous thoracic surgery at the intended site are all reasons to pause, seek senior input, and consider correction or an alternative approach. These are relative rather than absolute contraindications, and the balance shifts with urgency — in a tension pneumothorax, there is no absolute contraindication to decompressing the chest.
Sources
- British Thoracic Society — Clinical Statement on Pleural Procedures (2023)
- British Thoracic Society — Online Appendix 4: Intercostal Drain Insertion
- British Thoracic Society — Pleural Procedures resource hub
- British Thoracic Society — Training Standards for Pleural Procedures
This content is for professional education and simulation training. Chest drain insertion is an invasive procedure with potentially serious complications and must be performed by appropriately trained clinicians under local protocols, supervision, and emergency support. It is not personal medical advice or a substitute for accredited clinical training.
Training Resources
For repeatable practice of the sequence above, MEDTACEDU’s Pneumothorax Haemothorax Chest Drain Model With Replaceable Skin Pads supports the full blunt-dissection route: chest landmark identification, controlled dissection through the chest wall, the palpable give-way as the pleural space is entered, and a finger sweep with enough intercostal space to admit a finger. Replaceable skin pads allow the incision-to-insertion sequence to be repeated across a cohort of learners.
For the temporising step that often precedes definitive drainage, the Needle Chest Decompression for Tension Pneumothorax Simulator covers the technique described in the separate needle decompression article. Explore all Airway, Chest & Drainage Trainers.