If you care for someone who is bedridden, uses a wheelchair, or has limited mobility, learning to recognize a pressure injury (also called a bedsore or pressure ulcer) early can prevent weeks of pain and serious complications. A pressure injury is not a minor skin problem—once the skin breaks down it can quickly progress to a deep, hard-to-heal wound. The single most powerful thing a caregiver or clinician can do is catch the earliest warning signs and act before the skin opens.
This guide focuses on early recognition—what the first signs look and feel like, why they are easy to miss (especially on darker skin tones), who is most at risk, and exactly what to check. For how long a pressure ulcer takes to heal once it has formed, see our companion guide: How Long Does It Take for a Pressure Ulcer to Heal?
What Is a Pressure Injury—and How Fast Does It Form?
A pressure injury is localized damage to the skin and the soft tissue underneath, usually over a bony prominence such as the tailbone, heels, or hips. It develops when sustained pressure—often combined with shear and friction—cuts off blood flow to the area. Without oxygen, the tissue begins to deform, become starved of blood (ischemia), and break down.
It can happen faster than most people expect. In an at-risk person, tissue damage can begin after as little as 2 hours of uninterrupted pressure. That is why the standard of care is to reposition an immobile person at least every 2 hours, and to encourage small weight shifts every 15–30 minutes for someone in a wheelchair. Because the damage can start so quickly and often begins beneath the surface, daily skin checks and early recognition are essential.
The Early Warning Signs of a Pressure Injury (Stage 1)
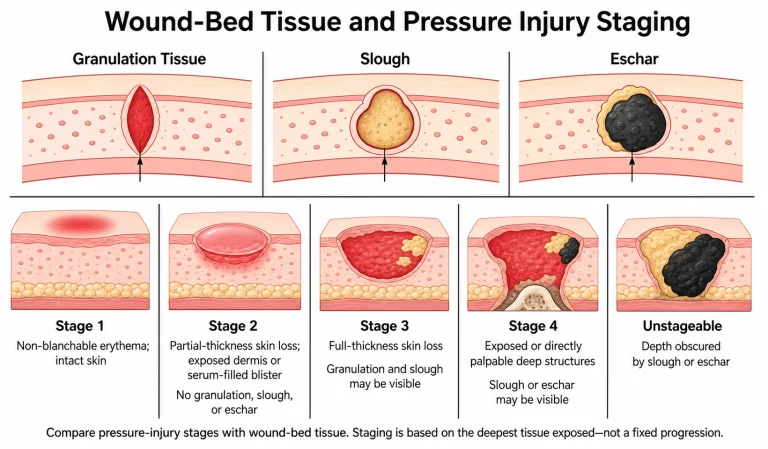
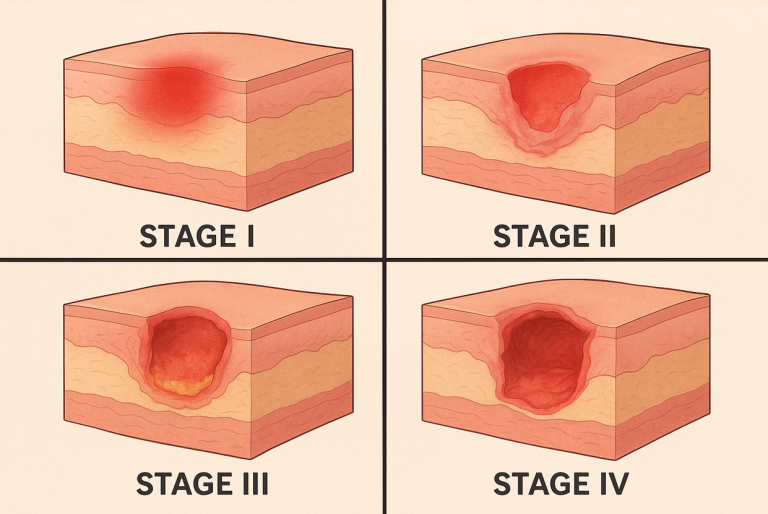
The earliest stage—Stage 1 pressure injury—happens while the skin is still intact. There is no open wound yet, but the body is signaling distress. Check the high-risk bony areas every day: heels, tailbone (coccyx) and sacrum, hips, ankles, elbows, and shoulder blades. Look and feel for these four signs:
1. A change in skin color
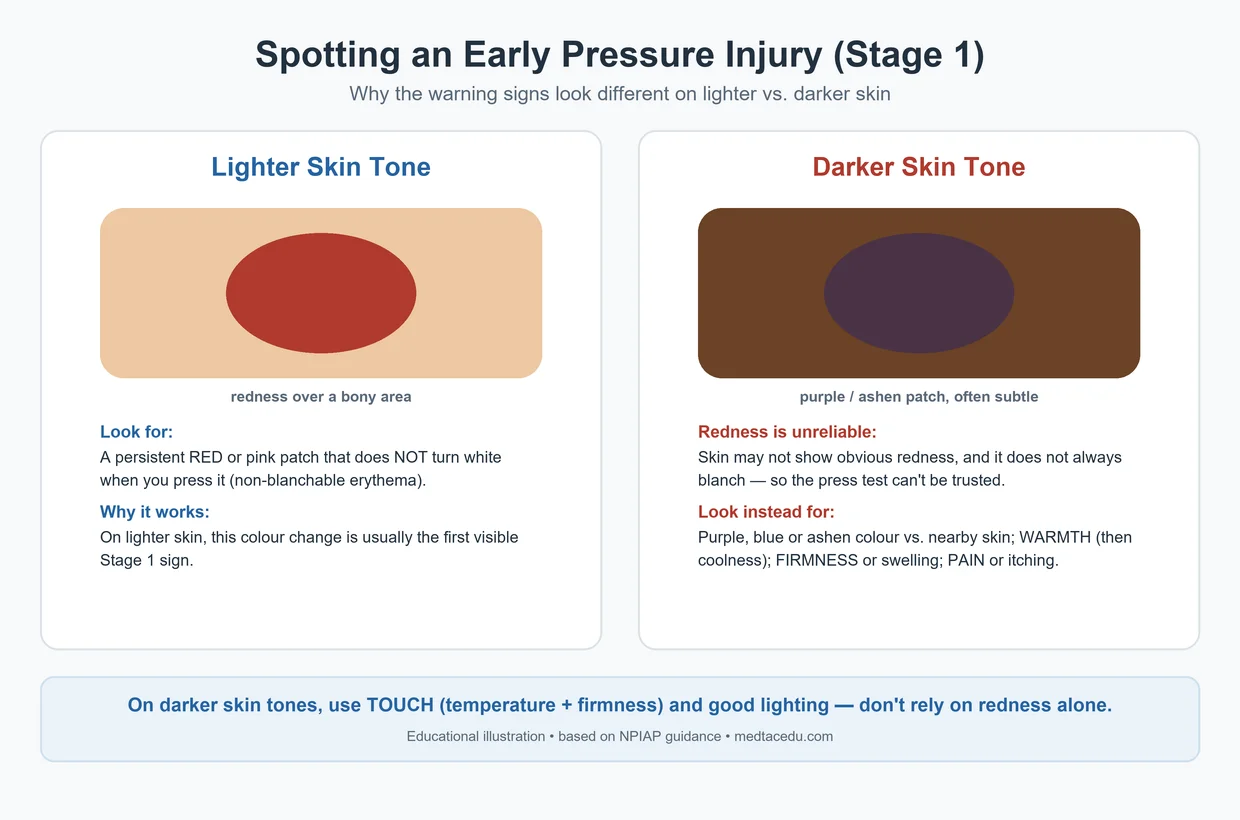
On lighter skin, look for a persistent red or pink patch that does not turn white (blanch) when you press it—known as non-blanchable erythema. On darker skin, the change is often subtler and may look purple, blue, or ashen, or simply darker than the surrounding skin (see the dedicated section below).
2. A change in temperature
The affected spot may feel noticeably warmer than the skin around it in the early phase, and sometimes cooler as tissue damage progresses. A temperature difference is one of the most reliable early clues—especially when color is hard to judge.
3. A change in texture or firmness
Run your fingers gently over the area. Early pressure injuries often feel firm and hard (induration) or, in some cases, unusually soft and boggy. Swelling (edema) may also be present. These tissue changes can appear before any visible color change.
4. Pain or a change in sensation
The person may report pain, itching, tingling, or a burning feeling in one specific spot. For those who cannot communicate, watch for non-verbal cues—grimacing, moaning, restlessness, or pulling away when the area is touched.
Take action immediately
If you notice any of these signs, relieve all pressure from the area right away and keep it offloaded. Do not massage a reddened or discolored area—rubbing can cause further damage to already fragile tissue. Document what you see and tell the care team or a healthcare professional.
⭐ Spotting Early Pressure Injuries on Darker Skin Tones
Most pressure injury education is built around looking for redness—but redness is exactly what is hardest to see on brown and black skin. This is a well-documented patient-safety gap: studies have repeatedly found that early-stage pressure injuries are detected less often and later in people with dark skin tones, which means they are frequently first identified only at a more advanced, open stage. Caregivers and clinicians need a different toolkit.
Why redness alone is unreliable
The National Pressure Injury Advisory Panel (NPIAP) notes that classic Stage 1 signs such as “erythema” and “non-blanchable erythema” are not always visible on darkly pigmented skin. Two problems compound each other: darkly pigmented skin may not show an obvious color change the way lighter skin does, and it is not always blanchable to begin with—so “it doesn’t turn white when pressed” cannot be trusted as a reliable test.
What to look for instead
On darker skin, lean on the signs that do not depend on seeing redness:
- Color shift relative to surrounding skin: the area may look purple, blue, darker, or ashen/grayish compared with nearby healthy skin—not “red.”
- Temperature change: the spot may feel warmer early on, then cooler as damage advances. This is one of the most valuable signs when color is unclear.
- Firmness and swelling: feel for induration (a hard, firm area), boggy softness, or edema compared with the opposite side of the body.
- Pain or altered sensation: a complaint of pain, tenderness, itching, or numbness over a bony area often precedes any visible change.
How to examine darker skin properly
- Use good lighting. Assess with natural daylight or a halogen lamp; poor or yellow lighting hides subtle changes.
- Compare side to side. Always compare the at-risk area with the matching spot on the other side of the body.
- Use touch, not just sight. Check temperature and firmness with your hand—your fingers will often detect a problem your eyes cannot.
- Ask about sensation. Where possible, ask the person whether the area feels sore, itchy, or different.
Who Is Most at Risk—and How Early Signs Differ
Anyone with limited mobility can develop a pressure injury, but risk—and how the early signs present—varies from person to person:
- Older adults: thinner skin and less cushioning fat over bony areas mean injuries can form faster and may show as a fragile, papery, or discolored patch. The sacrum and heels are especially vulnerable.
- People who are bedbound or have paralysis/spinal cord injury: complete immobility plus loss of protective sensation means they often cannot feel the early pain that would prompt a position change—making scheduled checks essential.
- People with diabetes or vascular disease: reduced blood flow and neuropathy slow recognition and healing, and the heels and feet need extra attention.
- Underweight or malnourished individuals: less fatty tissue to cushion bones, and lower protein stores for skin resilience.
- Anyone with skin moisture from incontinence or sweat: damp skin is more fragile and breaks down sooner.
Early-Detection Checklists
Early detection works best when everyone knows what to do. Here are two practical checklists—one for clinical staff, one for family caregivers.
For healthcare professionals
- Perform a structured risk assessment (e.g., Braden Scale) on admission and whenever the patient’s condition changes.
- Complete a head-to-toe skin assessment at least once per shift, including all bony prominences and skin under medical devices.
- For darker skin tones, assess with proper lighting and use temperature, firmness, edema, and reported sensation—do not rely on visible erythema alone.
- Document findings objectively (location, size, color, temperature, sensation) and photograph where policy permits.
- Implement and chart a repositioning schedule, offloading devices, and a pressure-redistribution surface for at-risk patients.
For family caregivers
- Make a quick head-to-toe skin check part of daily care—pick a consistent time, such as during bathing or changing.
- Look and feel: check bony areas for color change, warmth or coolness, firmness, and swelling; ask about pain or itching.
- Reposition at least every 2 hours in bed and every 15–30 minutes in a chair; use a simple chart as a reminder.
- If you see or feel an early sign, offload the area immediately, keep skin clean and dry, and do not massage it.
- Contact a healthcare professional promptly if a mark does not resolve after relieving pressure, or if the skin breaks open, blisters, or shows signs of infection (increasing pain, warmth, odor, or drainage).
The Bottom Line: Early Recognition Is Prevention
A pressure injury can begin in just a couple of hours, but a caregiver who knows the early signs is the most effective line of defense. Look beyond redness—use temperature, firmness, swelling, and the person’s own report of pain, and pay special attention to darker skin tones where color change is unreliable. Combined with a consistent repositioning routine and daily skin checks, early recognition stops a small Stage 1 change from becoming a deep, painful wound.
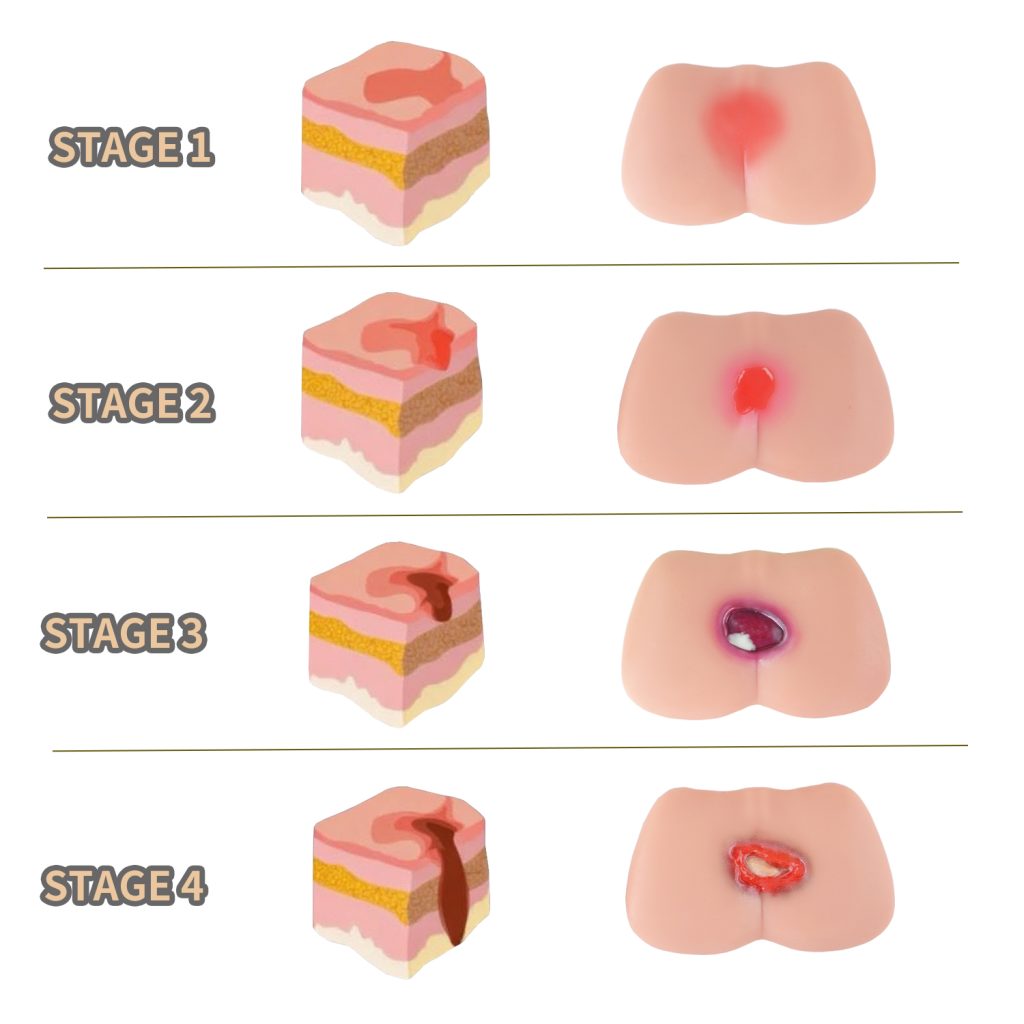
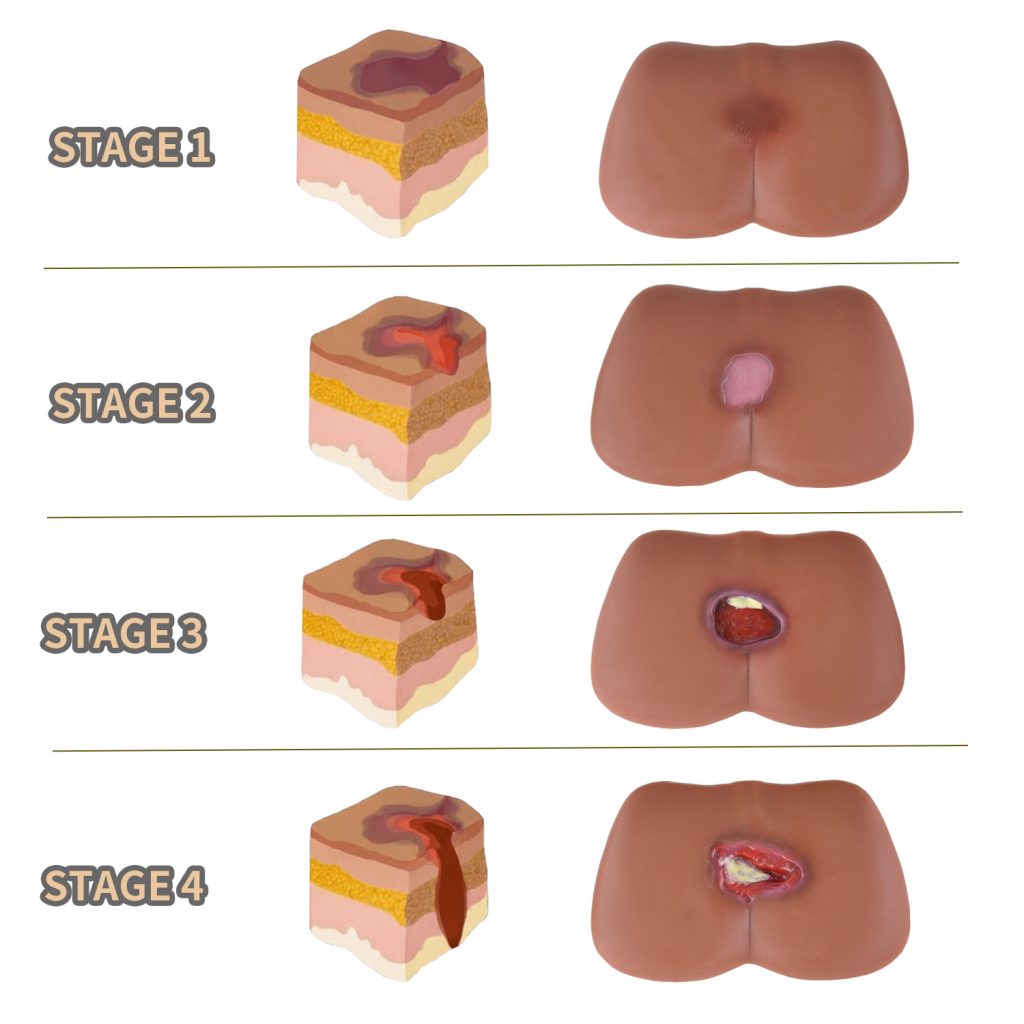
Recognizing the signs is one skill; knowing what each stage looks like in real tissue is another. The Pressure Ulcer Model 4 Stages Kit gives caregivers and trainees a tangible reference for Stage 1 through Stage 4, making skin-check training far more effective. For patients at higher wound risk, the 5 Stages of Diabetic Foot Ulcer Model Set is a useful complement. Browse the full range on our Wound Care, Ulcer & Stoma Models page.
🩺 Recommended Training Tools
- Pressure Ulcer Model 4 Stages Kit — See every stage from early redness to deep tissue damage; ideal for caregiver skin-check training.
- 5 Stages of Diabetic Foot Ulcer Model Set — Extended wound-progression model for training on diabetic foot ulcer risk.
References & Further Reading
- National Pressure Injury Advisory Panel (NPIAP) — Pressure injuries in persons with dark skin tones (npiap.com)
- American Journal of Nursing — “Skin Assessment in Patients with Dark Skin Tone,” 2023 (journals.lww.com/ajnonline)
- Wounds International — A Quick Guide to Pressure Injury Management (woundsinternational.com)
- NurseTogether — Pressure Ulcers Nursing Diagnosis & Care Plan (nursetogether.com)
- Merck Manual — Pressure Injuries (merckmanuals.com)
Disclaimer: This article is for educational purposes only and is not a substitute for professional medical advice, diagnosis, or treatment. Always consult a qualified healthcare professional. Last updated: June 2026.