An endotracheal tube can pass through a dog’s vocal folds and still be unsafe. It may be too narrow, too deep, too shallow, overinflated, kinked, blocked, or displaced after the patient is moved.
Correct canine endotracheal tube placement therefore has four parts: choose a suitable diameter, set the distal tip at a safe depth, create the lowest effective cuff seal, and continuously confirm ventilation.
This guide focuses on those decisions and on the warning signs that require immediate correction. For the step-by-step placement procedure itself — positioning, laryngoscopy, and tube passage — see How to Intubate a Dog.
What Is the Correct Endotracheal Tube Position in a Dog?
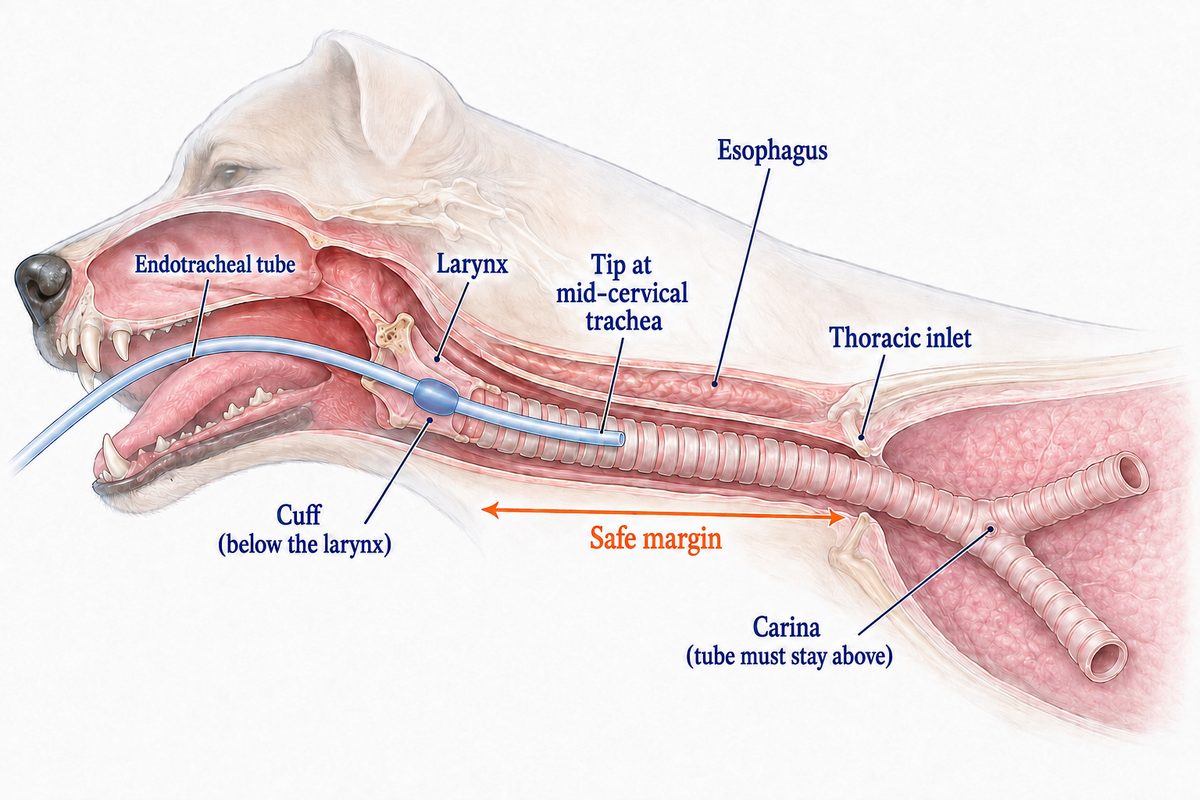
For routine orotracheal intubation, the tube passes between the arytenoid cartilages and through the rima glottidis into the cervical trachea.
AAHA describes the planned position as:
- the proximal end at or just outside the incisors; and
- the distal tip approximately midway between the larynx and thoracic inlet.
This position keeps the cuff below the larynx while reducing the risk that the tip enters a mainstem bronchus. It is an estimate, not a guarantee. Neck movement, patient repositioning, tube construction, and breed anatomy can all change the actual depth.
Why External Tube Depth Alone Is Not Enough
A number at the incisors is useful only if it belongs to that patient and that tube. Two tubes of the same internal diameter can differ in length, cuff position, bevel, and connector.
Document the endotracheal tube depth at the incisors so you can spot later migration. But the mark alone does not confirm placement — assess that physiologically. Capnography, bilateral ventilation, airway pressure, and rechecks after movement matter more than a memorized centimeter value.
Choosing Canine Endotracheal Tube Size
Endotracheal tube size normally refers to internal diameter in millimeters. A larger internal diameter reduces airflow resistance, but the tube must pass through the larynx without trauma.
Use a size chart or body weight only to prepare a range. Then consider:
- breed and skull shape;
- body condition;
- age;
- visible laryngeal opening;
- known tracheal or airway disease;
- the planned breathing circuit and connectors; and
- whether the tube passes easily rather than under force.
Select the largest tube that fits atraumatically. Always have at least one smaller and one larger option ready. Avoid compensating for a very small tube by excessively inflating its cuff.
Measuring Length Before Placement
Before induction, lay the tube along the dog without contaminating it. Estimate the distance from the incisors to a point in the cervical trachea near the midpoint between the larynx and thoracic inlet.
Do not push the tip to the thoracic inlet or beyond just because the full tube length is available. Excess length adds dead space outside the patient and makes endobronchial placement more likely. Only shorten a tube if its design and the manufacturer’s instructions allow you to remove the connector and refit it securely.
Four Layers of Placement Confirmation
1. Direct visualization
The operator should see the tube pass between the arytenoid cartilages into the glottis. This distinguishes the laryngeal opening from the esophagus during placement.
Direct visualization is valuable but not sufficient for the entire anesthetic. A correctly inserted tube can later migrate or obstruct.
2. Sustained capnography
In a dog with circulation, a repeatable ETCO2 waveform over successive breaths is the strongest practical sign that exhaled gas is returning from the lungs. Merck Veterinary Manual identifies end-tidal carbon dioxide monitoring as the most accurate confirmation method among common bedside checks.
An isolated number or one transient waveform is not enough. Gas introduced into the stomach during mask ventilation can occasionally produce a brief carbon dioxide signal after esophageal placement. Look for a sustained waveform that matches ventilation.
3. Bilateral ventilation assessment
Observe symmetrical chest expansion and listen over both sides of the thorax during a controlled breath. Unequal sounds or movement may indicate endobronchial placement, obstruction, lung disease, or a circuit problem.
Also listen over the stomach. Gurgling or gastric inflation suggests esophageal placement, although absence of gastric sounds does not prove tracheal placement.
4. Continuous monitoring
Correct placement is a monitored state, not a one-time event. Follow:
- ETCO2 waveform and value;
- oxygen saturation;
- respiratory rate and pattern;
- airway pressure;
- reservoir-bag movement;
- delivered and expired volumes when available;
- tube depth at the incisors; and
- bilateral breath sounds after repositioning or unexplained changes.
Pulse oximetry can warn of hypoxemia, but it may remain normal for a time after ventilation fails, especially after preoxygenation. It should not replace capnography.
Cuff Inflation: Seal Without Injury
The cuff should seal the trachea well enough for positive-pressure ventilation and control of anesthetic gas leakage. More air is not safer.
Overinflation can impair tracheal mucosal blood flow and contribute to pressure injury. Underinflation can allow a leak, inadequate ventilation, waste-gas exposure, or movement of fluid around the tube.
Use a cuff manometer when available. Otherwise use the institution’s minimal-occlusive-volume or minimal-leak technique with a manometer on the circuit. AAHA describes giving a controlled breath and adding air slowly only until the slight oral leak stops. Recheck the seal after the patient’s position changes and during long procedures.
The pilot balloon is not a reliable gauge of the pressure exerted by the distal cuff.
Common Placement Problems
Esophageal intubation
Warning signs include no sustained ETCO2 waveform, gastric sounds or distension, absent effective chest expansion, poor reservoir-bag behavior, and falling oxygen saturation.
For a confirmed esophageal tube: disconnect and remove it, oxygenate the patient, reassess anesthetic depth and positioning, then reattempt under direct visualization per the difficult-airway plan. Do not continue ventilating the stomach while waiting for desaturation.
Endobronchial intubation
A tube advanced too far may enter a mainstem bronchus and ventilate mainly one lung. Clues include unequal breath sounds, asymmetric chest movement, unexpected airway pressure, impaired oxygenation, or a depth mark farther in than planned.
Withdraw incrementally under monitoring until bilateral ventilation is restored, then secure and document the corrected depth. Consider other pulmonary causes if asymmetry persists.
Tube too shallow or displaced
A shallow tube may have its cuff near the larynx or slip out during movement. A sudden leak, lost ETCO2, changed depth mark, visible cuff, or ineffective ventilation requires immediate reassessment.
Do not blindly push a contaminated or partly displaced tube back into the airway. Manage oxygenation and replace it with appropriate technique when necessary.
Kinked or obstructed tube
A rising airway pressure, poor bag compliance, decreasing delivered volume, altered capnogram, or difficulty passing a suction catheter can indicate a kink, mucus plug, blood, foreign material, connector obstruction, or the bevel pressing against the tracheal wall.
Check the entire circuit and tube systematically. If patency cannot be restored promptly, replace the tube while maintaining oxygenation.
Cuff leak
First check tube depth, circuit connections, cuff valve integrity, and whether the cuff is damaged. A larger tube is not the automatic answer. Adding repeated large volumes of air to a poorly positioned or ruptured cuff can increase injury without fixing the leak.
Tube rotation during repositioning
The weight and torque of the breathing circuit can rotate or move the tube when the dog is turned. AAHA recommends disconnecting the breathing tube during patient repositioning to reduce tracheal rotation. Reconnect immediately and repeat all placement checks.
A Canine ETT Placement Checklist
Before induction
- Prepare multiple tube sizes.
- Inspect the lumen, connector, cuff, and pilot valve.
- Estimate and note the intended length.
- Check the laryngoscope, suction, oxygen, circuit, and monitors.
- State the difficult-airway and emergency plan.
Immediately after insertion
- See the tube pass through the glottis.
- Confirm a sustained ETCO2 waveform.
- Assess bilateral chest movement and breath sounds.
- Set the minimal effective cuff seal.
- Secure the tube and document size and depth.
- Confirm oxygen flow and normal circuit configuration.
During anesthesia
- Watch capnography and oxygen saturation continuously.
- Observe airway pressure and reservoir-bag movement.
- Check the incisors depth mark.
- Protect the tube and circuit from traction.
- Recheck after every position change or unexplained monitor change.
Before extubation
- Confirm adequate spontaneous ventilation and oxygenation.
- Ensure the dog can protect its airway according to the recovery plan.
- Suction or position the patient as indicated by the procedure.
- Deflate the cuff at the planned time.
- Keep oxygen, suction, and reintubation equipment ready.
Where Tube Placement Ends and Extubation Begins
The tube protects the airway only until it is removed, and removal has its own readiness criteria, technique, and complications. Extubation is part of airway management, not the end of monitoring: AAHA advises waiting until respiratory rate and oxygen saturation are appropriate and the dog can protect its airway with vigorous swallowing. For the full readiness checks, controlled removal, recovery monitoring, and the findings that call for reintubation, see Dog Extubation After Anesthesia.
Conclusion
Safe canine endotracheal tube placement depends on more than getting through the vocal folds. The tube must fit atraumatically, stop at an appropriate cervical-tracheal depth, seal at the lowest effective cuff pressure, and remain patent and correctly positioned throughout anesthesia and recovery.
Direct visualization begins the confirmation process. Sustained capnography, bilateral ventilation checks, depth documentation, and repeated reassessment keep that placement safe.
Frequently Asked Questions
How far should an endotracheal tube go into a dog?
There is no universal centimeter depth for every dog. AAHA recommends estimating the distal tip near the midpoint between the larynx and thoracic inlet, with the proximal end at or just outside the incisors. Confirm physiologically and document the actual depth for that patient.
Can pulse oximetry confirm that the tube is in the trachea?
No. Oxygen saturation may remain temporarily high after preoxygenation even when ventilation has stopped. Use direct visualization and a sustained ETCO2 waveform, supported by bilateral ventilation checks and continuous monitoring.
How often should tube position be rechecked?
Continuously through capnography and respiratory monitoring, plus a focused check after every patient movement, circuit disconnection, sudden leak, airway-pressure change, altered breath sounds, or unexplained change in oxygenation or ventilation.
Sources and Veterinary Disclaimer
- AAHA: 2020 Anesthesia and Monitoring Guidelines for Dogs and Cats
- AAHA: Induction and Intubation Tips
- AAHA: Equipment Preparation
- Merck Veterinary Manual: Initial Triage and Resuscitation of Small Animal Emergency Patients
- University of Minnesota Veterinary Clinical Skills Compendium: ET Tube Preparation and Placement
This article is for veterinary education and supervised simulation only. It does not replace a veterinarian’s assessment, formal airway training, device instructions, or local anesthesia, monitoring, and emergency protocols.
Training Resources
Use a species-appropriate canine airway simulator to practice tube selection, laryngoscope handling, depth measurement, cuff sealing, capnography confirmation, repositioning checks, and failed-airway drills. Human airway models represent different anatomy and should not be used as a substitute for canine-specific competency training.