Needle decompression (needle thoracostomy) is the emergency procedure that buys time in a tension pneumothorax — releasing trapped pressure so blood can return to the heart. This guide covers when needle decompression is indicated, the equipment you need, the two recommended insertion sites and which one current evidence favors, a step-by-step technique, and how to confirm it worked. It’s the clinical companion to our guide on tension pneumothorax signs and symptoms.
Important: This article is educational and written for clinicians, paramedics, and healthcare students who perform or train for this skill under proper supervision. It is not instructions for untrained members of the public. Needle decompression is an invasive emergency procedure with real risks and must be learned hands-on.
What Is Needle Decompression and When Is It Used?
Needle decompression involves inserting a large-bore needle or catheter through the chest wall into the pleural space to release air trapped under pressure. It is the immediate, temporizing treatment for a tension pneumothorax — it does not fix the underlying injury, but it converts a rapidly fatal tension pneumothorax back into a survivable simple pneumothorax until a chest drain can be placed.
It is indicated when a patient shows the clinical signs of a tension pneumothorax — severe respiratory distress, absent breath sounds on one side, and signs of shock (hypotension, distended neck veins, and in late stages tracheal deviation). As covered in our tension pneumothorax guide, this is a clinical decision made at the bedside — you do not wait for a chest X-ray in a crashing patient.
Equipment: Why Needle Length Matters
The single most common reason needle decompression fails is a needle that is too short to reach the pleural space. Recommended equipment reflects this:
- A large-bore catheter-over-needle, typically 14-gauge or larger (some services use 10-gauge).
- A length of at least 8 cm (3.25 inches). Older 5 cm (2 inch) cannulas frequently do not reach the pleural space in adults — CT studies show the chest wall is thicker than many assume, especially at the front of the chest. A longer needle dramatically improves the chance of success.
- Skin antiseptic, and a flutter/one-way valve or simple finger-cot valve where available.
Using too short a needle means you may go through all the motions and still not relieve the tension — which is why both site choice and needle length matter so much.
The Two Recommended Sites — and Which Is Better
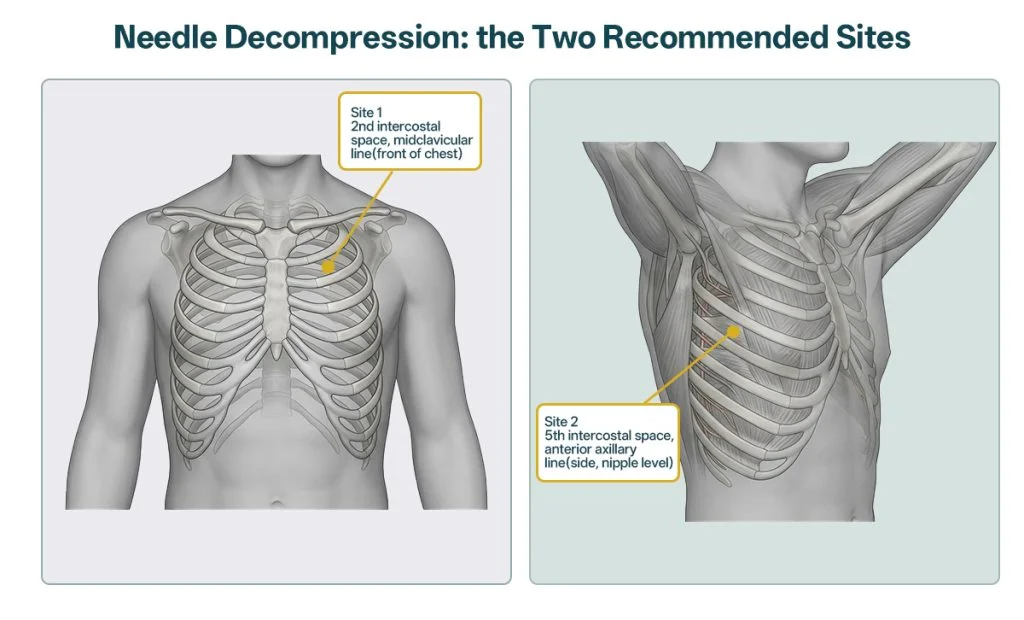
There are two anatomical sites used for needle decompression, and choosing between them is the question clinicians ask most. Here is each one, with the evidence behind it.
Site 1: 2nd intercostal space, midclavicular line (the traditional site)
The classic teaching site is the second intercostal space (2nd ICS) in the midclavicular line — on the front of the chest, just above the third rib, roughly in line with the middle of the collarbone. The needle is inserted over the top of the rib below to avoid the nerve and vessels that run under each rib.
Advantages: it’s fast to locate, accessible with the patient flat and arms at their sides, and doesn’t require exposing the side of the chest — useful during CPR or when the patient is packaged for transport.
Limitations: the chest wall here is often the thickest of the two sites, so a standard catheter may not reach the pleural space. Placed too far toward the midline, it also risks the internal mammary (internal thoracic) artery.
Site 2: 5th intercostal space, anterior axillary line (the lateral site)
The increasingly preferred site is the fifth intercostal space (5th ICS) in the anterior-to-mid axillary line — on the side of the chest, roughly at nipple level, just in front of the armpit. This is the same general area as the “triangle of safety” used for chest drains.
Advantages: the chest wall here is, on average, thinner, so a standard 8 cm needle is more likely to actually reach the pleural space; it sits well away from the internal mammary artery; and it’s anatomically continuous with where a chest drain will go.
Limitations: it requires access to the side of the chest (moving the arm), and on the left side the operator must respect the position of the heart. It can be slightly harder to reach in a crowded resuscitation.
So which site is better?
Current trauma guidance increasingly favors the 5th ICS in the anterior axillary line. Bodies such as PHTLS and military Tactical Combat Casualty Care (TCCC) now list the lateral site as a preferred or co-equal option, for two evidence-based reasons:
- Higher chance of reaching the pleural space. Imaging studies repeatedly show the chest wall is thinner at the 5th ICS lateral site than at the 2nd ICS midclavicular line, so decompression succeeds more often — the failure-to-reach problem is the main reason the older site fell out of favor.
- Lower risk of hitting major vessels, particularly the internal mammary artery that is at risk with a too-medial anterior approach.
That said, the 2nd ICS midclavicular site remains a valid, recommended option, especially when the lateral chest can’t be accessed or speed during CPR is critical. The honest takeaway is: prefer the 5th ICS anterior axillary line when you can, always use a needle at least 8 cm long, and treat needle decompression as a bridge to definitive chest drainage either way.
Step-by-Step Technique
The following outlines the procedure as taught in trauma courses. It is a summary for learners, not a substitute for supervised hands-on training. (For austere, no-kit field scenarios where improvised equipment is the only option, see our companion guide on needle chest decompression with improvised tools.)
- Confirm the indication. Reassess for the clinical signs of tension pneumothorax and identify the affected side.
- Choose and expose the site. Prefer the 5th ICS anterior axillary line; use the 2nd ICS midclavicular line if the lateral chest is inaccessible.
- Identify the landmark. Count down to the correct intercostal space and find the rib below your target space.
- Clean the skin with antiseptic if time permits.
- Insert the needle just over the top of the lower rib, at 90° to the chest wall, to avoid the neurovascular bundle that runs along the underside of each rib.
- Advance until you enter the pleural space. A rush or hiss of air, and often an improvement in the patient, signals success.
- Advance the catheter and withdraw the needle, leaving the catheter in place; secure it and attach a one-way/flutter valve if available.
- Reassess the patient and prepare for definitive treatment.
How to Confirm It Worked
Signs that decompression was successful include:
- An audible hiss or rush of air as the pleural space is entered.
- Rapid clinical improvement — easier breathing, rising blood pressure, and a recovering heart rate.
Remember that needle decompression can fail (short needle, blocked or kinked catheter, wrong side, or the diagnosis was something else). If the patient doesn’t improve, reassess — a second attempt, the alternative site, or moving to finger thoracostomy may be needed.
After Decompression: Definitive Treatment
Needle decompression is only a temporizing measure. The catheter is narrow and can block, kink, or fall out, and the underlying air leak is still there. Definitive management is:
- Finger thoracostomy in many pre-hospital and trauma settings — a small incision into the pleural space — and
- A chest drain (tube thoracostomy) connected to an underwater seal or valve, which re-expands the lung and manages ongoing leakage.
Every patient who has had needle decompression needs prompt reassessment and a definitive chest drain.
Complications to Be Aware Of
Needle decompression is life-saving but not risk-free. Recognised complications include:
- Failure to reach the pleural space (the commonest problem — usually a too-short needle or a thick chest wall).
- Injury to lung, heart, or major vessels, including the internal mammary artery at the anterior site.
- Bleeding or damage to the intercostal vessels and nerve if the needle passes under rather than over a rib.
- Creating a pneumothorax if the procedure is done on a patient who didn’t actually have one — which is why the clinical indication must be sound.
- Catheter kinking, blockage, or dislodgement after placement.
Careful site selection, correct needle length, and good landmark technique keep these risks low.
Training and Simulation
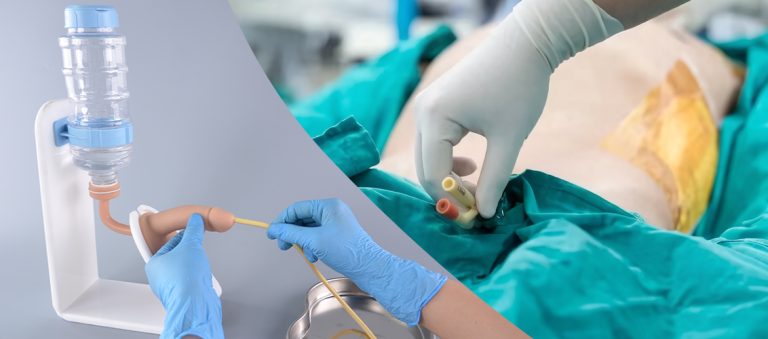
Because needle decompression is performed rarely but under maximum pressure, it is a procedure that benefits enormously from repeated simulation. Practising landmark identification, the “over the rib” insertion angle, and the feel of entering the pleural space on a task trainer builds the muscle memory that makes the real thing fast and safe — without any risk to a patient.
Frequently Asked Questions (FAQ)
Why insert the needle over the rib rather than under it?
The intercostal nerve, artery, and vein run in a groove on the underside of each rib. Inserting just over the top of the lower rib of your chosen space keeps the needle clear of that neurovascular bundle and reduces the risk of bleeding.
What happens if needle decompression is done but there was no tension pneumothorax?
Putting a needle into the chest of someone who didn’t have a pneumothorax can cause one, along with other injury. This is why the procedure is reserved for patients with clear clinical signs of tension physiology, and why sound assessment matters as much as technique.
Does needle decompression fix the problem permanently?
No — it’s a temporizing bridge. It relieves the dangerous pressure but the lung is still collapsed and the air leak remains, so every patient needs a definitive chest drain (and often finger thoracostomy) soon afterward.
Can needle decompression be repeated if the patient deteriorates again?
Yes. The thin catheter can block, kink, or dislodge, so if tension signs return, the patient may need a repeat attempt, the alternative site, or escalation to finger thoracostomy and a chest drain. Re-assessment after the first attempt is essential.
Sources
- PHTLS (Prehospital Trauma Life Support) — needle decompression sites and technique
- Tactical Combat Casualty Care (TCCC) Guidelines — tension pneumothorax management
- Advanced Trauma Life Support (ATLS), American College of Surgeons
- StatPearls / NCBI Bookshelf — Needle Thoracostomy / Tension Pneumothorax
- Emergency medicine and trauma literature on chest-wall thickness and decompression site selection
This article is for medical education only and is not a substitute for accredited, supervised clinical training. Needle decompression is an invasive emergency procedure performed by trained clinicians and pre-hospital providers. If you encounter a person with a suspected serious chest injury, call your local emergency number immediately.
🩺 For Students, EMS, and Training Teams
Needle decompression is a low-frequency, high-stakes skill that should be over-rehearsed on a trainer before it’s ever needed on a patient. Our Tension Pneumothorax & Needle Decompression Simulator lets learners practise locating both insertion sites and feel the release of air on decompression, while the Pneumothorax Haemothorax Chest Drain Model With Replaceable Skin Pads extends training to chest-landmark identification, pneumothorax and haemothorax decompression, and chest-tube insertion using replaceable puncture modules.