Canine intubation gives an anesthetized dog a patent airway, a route for oxygen and inhalant anesthetic, and a way to provide positive-pressure ventilation when needed. It can also reduce aspiration risk when the airway is no longer able to protect itself.
It is not a procedure for an awake pet or an untrained owner. Intubation requires an appropriate anesthetic depth, working equipment, continuous monitoring, and a veterinary team prepared to manage a failed or difficult airway.
The terms canine endotracheal intubation and dog endotracheal intubation both describe placing a tube through the dog’s mouth and larynx into the trachea. This guide focuses on intubating a dog by the standard orotracheal approach, the landmarks that matter, and the checks that should follow placement.
This article is for veterinary education and supervised simulation. It is not a substitute for hands-on training, a patient-specific anesthetic plan, or local clinical protocols.
Endotracheal Intubation in Dogs: When Is It Used?
Veterinary teams commonly intubate dogs during general anesthesia. A cuffed endotracheal tube can:
- keep the upper airway open;
- deliver oxygen and inhalant anesthetic;
- support controlled or assisted ventilation;
- allow capnography and respiratory monitoring;
- reduce leakage of waste anesthetic gas; and
- help protect the lower airway when normal protective reflexes are lost.
Airway control may also be needed during resuscitation or when disease, trauma, swelling, or foreign material threatens ventilation. Those emergencies require a trained team and a separate airway plan; repeatedly forcing a routine tube past an obstruction is unsafe.
Can a Conscious Dog Be Intubated?
Routine orotracheal intubation should be performed only after the dog has reached an anesthetic depth that permits the mouth to open and the tube to pass without purposeful movement, swallowing, coughing, or marked laryngeal resistance.
An inadequately anesthetized dog can bite, aspirate, develop airway trauma, or experience an unsafe sympathetic response. A dog that is unresponsive because of cardiopulmonary arrest is a different emergency context. In either situation, personnel must be trained to manage the airway and ventilation.
Dog Intubation Equipment to Prepare Before Induction
Airway equipment should be selected and checked before anesthetic drugs are given. Prepare:
- several cuffed endotracheal tubes around the estimated size;
- a functioning laryngoscope with an appropriate blade;
- a syringe for the cuff;
- sterile water-soluble lubricant;
- gauze or another approved tube tie;
- suction with suitable catheters;
- oxygen, a checked breathing circuit, and a reservoir bag;
- a capnograph and pulse oximeter;
- a face mask for preoxygenation; and
- a documented backup plan for difficult or failed intubation.
Inspect each tube for obstruction, cracks, connector security, and cuff leakage. Inflate the cuff before use, confirm that it holds air, then fully deflate it. Do not rely on how the pilot balloon feels to judge cuff pressure after placement.
If the anesthetic plan also requires venous access, prepare and secure it before induction when clinically appropriate. See the step-by-step guide to canine IV catheter placement for site selection, placement, and patency checks.
Choosing the Tube: Separate Diameter From Insertion Length
Two different measurements are often mixed together in training videos:
| Decision | What the initial estimate helps with | What makes the final decision |
|---|---|---|
| Tube diameter | Body weight, breed type, gentle cervical-tracheal palpation, and any recent thoracic imaging help the team prepare a range of internal diameters | The largest tube that enters the glottis easily without force or trauma |
| Insertion length | An external measurement along the dog’s head and neck helps predict where the distal tip may lie | The tube position at the incisors plus direct placement, ETCO2, bilateral ventilation, and repeated checks after movement |
How to estimate tube diameter
The size printed on a standard endotracheal tube usually refers to its internal diameter in millimeters. Weight-based charts are useful for choosing which tubes to open or keep ready, but they are not prescriptions. Breed, body condition, neck shape, age, and airway disease can produce very different tracheal diameters in dogs of similar weight.
Use this practical sequence:
- Start with the clinic’s weight or breed guide.
- Gently palpate the cervical trachea to sense its approximate external width; do not squeeze or treat the palpated width as an exact internal measurement.
- Prepare the estimated tube plus at least one size smaller and one size larger. Check all three cuffs and connectors before induction.
- Once the larynx is visible, compare the tube’s outside diameter with the opening between the arytenoid cartilages.
- Choose the largest tube that advances without force. If the bevel catches, the arytenoids deform, or the operator needs to push, stop and try the smaller tube rather than “working” the large tube through.
AAHA recommends the largest diameter that fits easily because a tube that is too narrow increases airflow resistance, connector dead space becomes more important, and a large cuff volume may be needed to achieve a seal. A tube that is too large can traumatize the larynx or fail to pass.
Radiographic measurement can refine selection in patients with recent, appropriately positioned thoracic images. A Beagle study found that an outside tube diameter around 70% of the internal tracheal diameter at the thoracic inlet performed well in that study population. This is useful evidence, not a universal bedside formula for every breed.
How to estimate insertion length
“Nose to shoulder” is an imprecise shorthand seen in some demonstrations. It is a length estimate, not a method for choosing tube diameter. It can also overestimate insertion if the operator measures from the nose but later places the connector at the incisors.
A clearer method is to lay the selected tube beside the anesthetized or calmly positioned dog without contaminating it:
- Place the connector end at the level where it will sit—at or just outside the incisors, not at the tip of the nose.
- Follow the tube along the lateral neck.
- Aim the distal tip at approximately the midpoint between the larynx and thoracic inlet. The point of the shoulder can help locate the region, but it is not the intended destination of the tube tip.
- Note the centimeter mark expected at the incisors or place an approved temporary mark on the tube.
If a local checklist starts its external measurement at the nose, subtract the nose-to-incisor segment or translate the measurement into a planned mark at the incisors. The purpose is to predict where the distal tip will end, not to insert the tube to the full nose-to-shoulder distance automatically.
External measurement remains a pre-intubation estimate. After placement, confirm ventilation and bilateral airflow, document the actual incisor depth, and recheck it whenever the dog’s head or body moves.
Positioning the Dog to Expose the Epiglottis
Dogs are commonly intubated in sternal recumbency with the operator facing the mouth. Lateral or dorsal intubation can be used when the procedure or patient requires it, but the team should practise those views before an emergency.
Set the operator’s line of sight first
Raise or lower the table so the operator can look through the mouth toward the larynx without hunching, twisting, or pulling the head toward themselves. A poor operator angle is easily mistaken for a difficult canine airway.
The assistant should support both the head and cervical spine. Holding only the muzzle high while the heavier neck sags creates a bend instead of a clear path. Lift and extend the head-neck unit gently, keeping the nose, midline of the mouth, and sternum from rotating away from one another.
Is “three-axis alignment” the goal in dogs?
Human direct-laryngoscopy teaching often describes aligning the oral, pharyngeal, and laryngeal axes. Modern human airway literature treats this as a useful model rather than literal perfect anatomical alignment, and veterinary guidelines do not establish a validated canine “three lines must coincide” rule.
For canine training, use it as a line-of-sight coaching cue:
- the oral opening should face the operator;
- the tongue and soft tissues should be moved out of the visual path;
- the pharyngeal passage should lead the eye toward the epiglottis; and
- the laryngeal inlet should come into view without forceful neck extension.
If the epiglottis is hidden, change one variable at a time: lift the whole head slightly, add or reduce gentle atlanto-occipital extension, straighten rotation, adjust the operator’s eye level, then reposition the tongue and laryngoscope blade. Small changes are more informative than a large blind pull on the muzzle.
Assistant hand placement
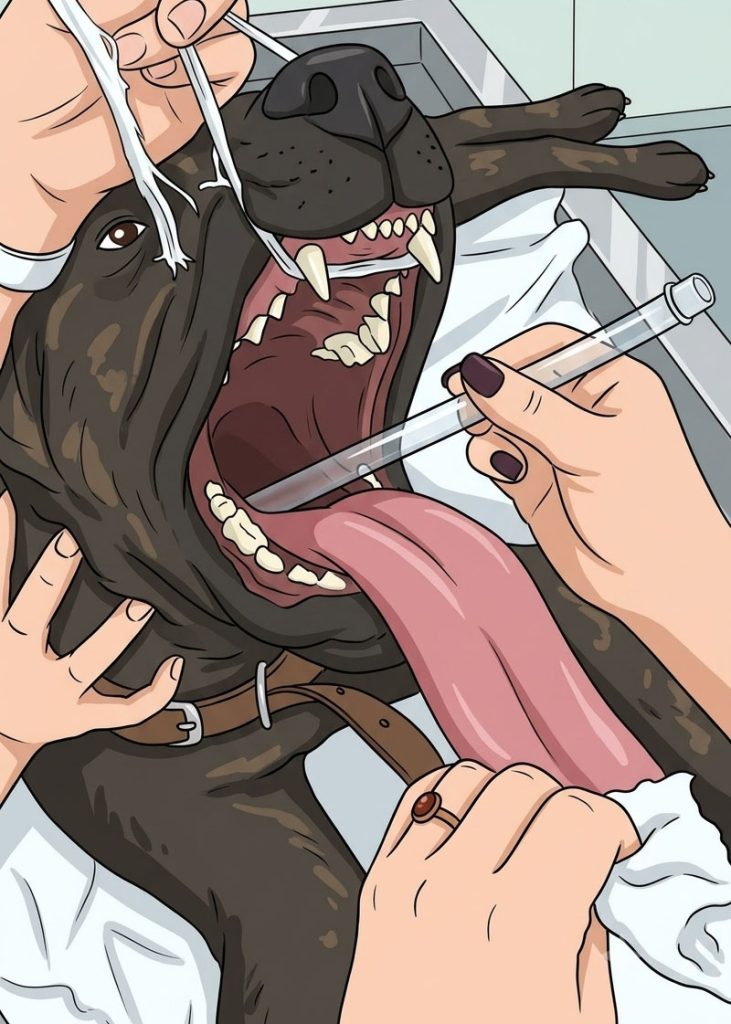
For a small dog, one hand can stabilize the sides of the head or maxilla while the other opens the lower jaw. With a larger dog, the assistant may need one hand behind the upper canine region and the other supporting the occiput or neck so the head does not fold backward independently of the cervical spine.
Use gauze to draw the tongue gently rostrally and to one side. Keep the tongue free of the lower canine teeth, avoid prolonged compression, and release excessive traction as soon as the view is established.
Extreme extension is not automatically better. Use patient-specific limits in dogs with suspected cervical injury, neck pain, atlantoaxial disease, a mass, brachycephalic airway changes, or previous airway surgery.
Dog Airway Landmarks for Intubation
The key structures are:
- Epiglottis: the leaf-shaped structure at the base of the tongue.
- Arytenoid cartilages: paired structures bordering the entrance to the larynx.
- Rima glottidis: the opening between the arytenoids and vocal folds through which the tube must pass.
- Esophageal opening: located dorsal to the laryngeal entrance and a common site of incorrect placement.
The endotracheal tube must be seen entering the rima glottidis. Advancing a tube blindly toward the back of the mouth makes esophageal placement and soft-tissue trauma more likely.
How to Intubate a Dog Step by Step
1. Complete the anesthetic safety check
When intubating a dog, begin by confirming the patient, procedure, anesthetic plan, fasting instructions, risk assessment, monitoring, emergency drugs, equipment checks, and team roles. Preoxygenate when indicated, especially if difficult intubation or limited oxygen reserve is expected.
2. Induce to an appropriate depth
Administer the veterinarian-selected induction protocol. Confirm that jaw tone and protective reflexes are sufficiently reduced for intubation while continuing to monitor breathing and circulation.
3. Open the mouth and control the tongue
The assistant supports the maxilla and the weight of the head-neck unit, opens the lower jaw, and gently draws the tongue forward with gauze. The operator should be able to see straight along the midline rather than around a rotated tongue or palate.
Practical check: if the muzzle points upward but the base of the neck drops toward the table, ask the assistant to lift the occiput and straighten the cervical spine instead of extending the nose farther.
4. Insert the laryngoscope
Hold the laryngoscope in the left hand and advance the blade along the tongue while watching the blade tip. Use it to displace the tongue and soft tissue until the epiglottis is identified. Keep the handle away from the incisors; the teeth must not become a fulcrum.
Practical check: insert only as far as needed to identify the next landmark. If the screen or direct view shows only pink tissue, withdraw slightly to a known structure and advance again under vision rather than sweeping blindly.
5. Identify the epiglottis and arytenoids
Follow the tongue caudally to the leaf-shaped epiglottis. With a straight veterinary blade, the operator can use the blade tip at the base of the tongue to move the epiglottis ventrally and expose the arytenoid cartilages. Apply controlled lift through the handle; do not lever backward on the teeth or jab the epiglottis.
If the epiglottis remains hidden:
- confirm that the tongue is pulled forward rather than folded under the blade;
- ask for a small lift of the whole head and neck;
- reduce any left-right rotation;
- adjust the blade a few millimeters rather than pushing deeper;
- suction saliva, blood, or regurgitated material that blocks the landmark; and
- reassess anesthetic depth if jaw tone or swallowing prevents exposure.
The target view does not need to be photograph-perfect. The operator needs a clear, continuous view of the glottic opening sufficient to watch the tube pass between the arytenoids.
6. Pass the tube through the glottis
Apply a light coating of sterile water-soluble lubricant without blocking the lumen. Hold the tube so its curve follows the path toward the glottis. Under direct vision, advance the bevel between the arytenoids.
Practical check: when the tip reaches the glottis, a small rotation may help the bevel pass without catching, but rotation must never substitute for choosing a smaller diameter. Stop if there is marked resistance, arytenoid distortion, bleeding, or loss of the view; reassess depth, alignment, tube size, and anatomy rather than forcing it.
7. Advance only to the planned depth
Advance until the planned mark reaches the incisors, then pause. The connector should remain at or just outside the mouth and the distal tip should stay in the cervical trachea rather than entering a main bronchus.
Practical check: keep one hand controlling tube depth until the tie is secure. A dog can cough, the assistant can change grip, or the breathing circuit can pull the unsecured tube several centimeters in seconds.
8. Confirm tracheal placement immediately
Direct visualization through the arytenoids is the first check. Connect capnography and look for a sustained, repeatable end-tidal carbon dioxide waveform over several breaths. Also assess chest movement, reservoir-bag movement, airflow, bilateral breath sounds, and the absence of gastric sounds.
No single visual clue should replace capnography when it is available. Condensation can occur in an incorrectly placed tube, and an initial small carbon dioxide reading may reflect gas in the stomach.
9. Inflate the cuff to a minimal seal
Inflate only enough to prevent an audible leak during a controlled breath at the pressure specified by the anesthetic protocol. Excess cuff pressure can injure the tracheal mucosa. A cuff manometer is preferable when available.
10. Secure, connect, and document
Tie the tube securely without compressing soft tissue. Connect the breathing circuit, ensure oxygen flow, reopen the pop-off valve after any leak test, and start continuous respiratory monitoring. Record tube internal diameter, depth at the incisors, cuff method or pressure, and confirmation findings.
Immediate Checks After Positioning the Dog
Moving the patient can advance, withdraw, kink, or rotate the tube. Disconnect the breathing circuit before turning the dog so the circuit does not twist the tube. After every position change, repeat the placement checks:
- visible depth mark at the incisors;
- continuous ETCO2 waveform;
- equal bilateral chest movement and breath sounds;
- appropriate airway pressure and reservoir-bag movement; and
- no new leak, obstruction, or unexpected change in oxygen saturation.
When to Stop and Escalate
Stop repeated attempts and call for the difficult-airway plan if:
- the larynx cannot be visualized;
- the tube repeatedly enters the esophagus;
- oxygen saturation is falling;
- blood, swelling, a mass, or foreign material blocks the view;
- the expected tube sizes will not pass without force;
- ventilation remains ineffective after apparent placement; or
- resistance suggests laryngeal or tracheal injury.
Prioritize oxygenation between attempts. The safest next step may be repositioning, suction, a different tube or blade, a more experienced operator, an alternative airway device, or emergency surgical airway access depending on the patient.
Related Canine Clinical Skills Guides
- Canine Endotracheal Tube Placement: Size, Depth, Confirmation, and Troubleshooting — choosing tube diameter, setting a safe depth, sealing the cuff, and correcting placement problems.
- How to Place a Canine IV Catheter — preparing reliable venous access for anesthesia, fluids, and emergency medication.
- Canine Venipuncture and Blood Collection — choosing and accessing the cephalic, jugular, and saphenous veins.
- Dog Jugular Vein Phlebotomy — positioning, landmarks, restraint, and step-by-step jugular collection.
- Difficult Canine Jugular Venipuncture — troubleshooting failed draws, complications, and special patients.
- Dog Injections: Subcutaneous vs Intramuscular — comparing common medication routes and their safety limits.
Conclusion
Successful dog intubation is not simply passing a tube into the mouth. It requires a prepared team, adequate anesthetic depth, direct identification of the glottis, atraumatic tube passage, correct depth, a minimal cuff seal, and objective confirmation with continuous monitoring.
The procedure is complete only when the tube has been secured, documented, and rechecked after every patient movement.
Frequently Asked Questions
Should a stylet be used for routine dog intubation?
Many dogs can be intubated without one. If a stylet is used under local protocol, it must remain inside the tube, never protrude beyond the distal tip, and be handled so it cannot damage the airway. A stylet should not be used to force a tube past unseen resistance.
Why prepare several endotracheal tube sizes?
Body weight does not predict airway diameter perfectly. Having the estimated size plus adjacent sizes ready prevents delay and reduces the temptation to force a poorly fitting tube.
Is condensation in the tube enough to prove correct placement?
No. Condensation, chest movement, and bag movement are supportive signs, but a sustained ETCO2 waveform is a stronger objective confirmation when circulation is present. Use multiple checks and continue monitoring.
Sources and Veterinary Disclaimer
- AAHA: 2020 Anesthesia and Monitoring Guidelines for Dogs and Cats
- AAHA: Induction and Intubation Tips
- AAHA: Equipment and Intubation Preparation
- Merck Veterinary Manual: Initial Triage and Resuscitation of Small Animal Emergency Patients
- University of Minnesota Veterinary Clinical Skills Compendium: ET Tube Preparation and Placement
- Brown: Endotracheal Intubation in the Dog, Lab Animal
- Predicting Dog Tracheal Diameter and Length: A Tool for Improved Intubation
- Selection of Appropriate Endotracheal Tube Size Using Thoracic Radiography in Beagle Dogs
This article is for veterinary education and supervised simulation only. It does not replace a veterinarian’s assessment, formal airway training, the endotracheal tube manufacturer’s instructions, or an institution’s anesthesia and emergency protocols.